Wednesday, November 29, 2023

Let it Snow Layout | Mercy Tiara Kit Club DT

Hey everyone!! How are you doing today? Were halfway through the week, woot, woot!! Well, I thought I’d share a layout with you really quick that I made using the joy kit from Mercy Tiara kits club. This kit is beautiful and there are links below where you can go and grab it too.
I did a little different with this layout and pulled mostly blues, whites and a little bit of wood grain too. I had fun with a little bit of mixed media, a stencil and a bit of layering!
There is a full video up over on my Youtube channel if you’d like to see how this whole layout came together! Thank you for coming by to check it out! I hope you come back to see what else I come up with! You can find your Mercy Tiara Kits here

Waving Hi card | Cut Cardstock DT

Good morning everyone! I hope you're having a good week, it's almost the weekend!! Well this is my last post for Cut Cardstock and I thought I would share a cute polar bear card with you guys I made.
Seriously, I think these little guys are so cute! This stamp is the BB Polar Bear Pals from My Favorite things, so I used those and I went with a blue and white color scheme for the whole card, as you can tell. lol. I used Cougar White Smooth CardStock for the base of my card as I normally do. Then I grabbed a piece of Surf. I cut it slightly smaller than the 4 1/4 x 5 1/2 card base and ran it though my sizzix with a 3E embosser.
I cut a 4x5 1/4 piece of white to have as my background, cut a few hills and then pulled out my cloud stencil. I Grabbed my tumbled glass distress oxide for my clouds. When that was done I went to stamping my bears, their fish bucket and my sentiment on another sheet of Cougar White Smooth CardStock.
I pulled out my Tri Blend alcohol markers by Spectrum noir, adding some color to the polar bears scarfs, a little shading to their bodies and of course a little color to their feet. I also colored in the bucket of fish. At this point all there was left to do was to add everything to the card. I placed the hills where I wanted them and then decided where I wanted mhy Polar bears and their bucket of fish. I had my sentimit, but I thought with it being on white that it blended in to much. So I grabbed my tumbled glass distress oxide again and inked up the edges. Popped it up on some foam and placed it at the bottom left of my card and call it done! I hope you enjoyed this card and the cute little polar bears!!! I hope you have a great rest of your week!!

Tuesday, November 14, 2023

Hedgehog Slimline cards | CutCardstock DT

Hey everyone! I hope your week has started off pretty good! Well today I wanted to share these two cute little fall cards with Hedgehogs on them! I think they are just too cute!
I created the base of my cards out of Cougar White Smooth CardStock, like normal. I also did all of my stamping on the same cardsrtock. This is my normal, I like the way the paper takes the different inks. Not just stamping but distressed oxide too, as you can see I made a background piece with distress oxide and a cloud stencil.
I colored all of my little hedgehogs,(these are My Favorite Things, Happy Hedgehogs), with my alcohol markers and a little white gel pen. I ran some patterned paper through my sizzix and created the scalloped edge and then ran Gingersnap cardstock through my sizzix as well with the dies to cut out the holes. I had to have somewhere for the cute little hedgehogs to go!
Once I had places all the hedgehogs, their logs, mushrooms and othere little things down I added some 3D foam to the back of the solid cardsotck and stuck it down. On the green casrds I had chosen to use Gumdrop Green, I pulled out a few distress oxides from my stash and inked around the edges and stamped my sentiments and call these cards done! I hope you enjoyed these cards and I hope you come back to see what else everyone comes up with!

Monday, October 16, 2023

This is my Summer layout | DLS Design DT

Hey everyone! How are you doing this morning? It's actually getting cool here but I'm going to keep doing summer layouts! lol Do you scrap seasonally? Only summer in summer and winter in winter? Well I wanted to share a layout I made for DLS design, I have a process video for it as well and will add that link towards the bottom.
I pulled out some of the stencils, sime of my distress oxides from my stash and went to town on the background. It still suprises me from time to time that it really doesn't take to much time to play with a little mixed media. I added a little water to the edges so that they wouldnt be clena and perfect, well i guess you'll see that in the video lol
But I had fun playing with the stamps ontop of the stencilling, and moved on to cutting and layering papers. Ok I'll stop talking now and you can just watch the video lol. Hope you enjoy!

Friday, October 13, 2023

One Fine Day layout | Cut Cardstock DT

Good morning everyone!! Are you happy its Friday?!? I am! lol I'm ready for the weekend and some fun outdoors! Today I'm here to share a cardstock heavy layout!! And I love it! I ran 7 different cardstocks; Stardream Metallic Copper, Textured Pink Carnation, Canvas Textured Wild Salmon, Textured Flame Tree Orange, Orange Zest, Canvas Textured Rubber Ducky Yellow and Canvas Textured Galax Olive Green, through my sizzix using a fringe die. I ran a piece of the Cougar White Smooth CardStock through my silhouette and cut out a bunch of leaves. I saved the ones I cut out but I actually wanted to use the other part as my background.
I grabbed a random piece of paper from my stash and laid my fringe pieces out on it so that I knew I had enough pieces and that it was in the order I wanted. I also checked to make sure that my top piece would sit correctly. I added 3d foam adhesive to the back of the cutfile and placed it over the top, after I had gotten all the fringe pieces stuck down.
I pulled out the stash kit I've been working with. I added a few paper layers behind my photo and stuck it down, then moved on to adding embellishments and finding a title.
I thought this sticker that said One fine day, was perfect! This day had been fantastic and the kiddos had had so much fun, it worked! I pulled the leafy bits from the sticker sheet and added those in a few places. Along with a few other stickers that I layered in the bottom left corner, the left side of my photo and up at the top as well.
I pulled some older supplies from my kit and added some of the shiny rhinestone wooden buttons here and there, decided I wanted white splatters and that ended this layout! Hope you enjoyed this layout!

Friday, September 29, 2023

Halloween coffee Panda cards | Cut Cardstock DT

Good mornig everyone!! How are you doing and are you ready for fall or haloween?? I sure am and have been. But here where I live we keep getting teased with fall but it keeps getting hot again :(. Well this morning I wanted to share with you two cards that I made and ones a shaker!!
I used my normal base for my cards, Cougar Smooth White cardstock, I pulled the Halloween American crafts paper pad I got from Cut cardstock and matched some of the cardstock to it. I ended up pulling Wedding cake, Gunmetal, and Orange Zest.
Once I had everything picked out and matched, things came together quite easily. I ran some of the Halloween paper throught my sizzix to cut out the coffee cups, the first one I turned into a shaker with some cute little punkins I had in my stash. I had stamped out some cute little pandas in the beging and I added one to the center of my shaker. once I had the shaker put together I added a piece of patterned paper to the front of my card base and moved on to my other card.
This one wasn't a shaker, so it came together even faster. I went ahead and cut another coffee cup out, inked my panda with some distress oxide and drew some little stitches on him like Frankenstein. I inked the edges of my coffee cup pieces, glued everything together. Stamped boo on the coffee cup sleeves and call these cards done! I hope you enjoyed these cards and if youd like to see a bit more you can watch a quick video here on my Tiktok.

Wednesday, September 27, 2023

Life is sweet layout | Mercy Tiara Kit Club | Take me home kit

Good morning everyone!! I got my September kit from Mercy Tiara kits last night and I had to dive right in! I made a quick unboxing, you can find that on my youtube channel, along with a process video for this layout too,just a heads up lol. But I really had to dive right in and make a layout, I have other layouts with Augusts kit still, but I wanted to play. So here is my first layout with this kit.
I knew what pictures I wanted to scrap, these sweet ones of one of my daughters and this sweet horse that she loves to feed, brush, and talk to. This is probably one of her favorite things right now. I didn't want a white background so I went for the Bazzil mint cardstock with the cute little dots on it. I added a little TCW shimmery goodness out of my stash, jutst to add some shimmer to the layout.
I cut little strips from one of the Simple stories papers and a strip from one of the Fancy pants papers and added them to the top and bottom of the layout.
I'm not patient, so I started to add layers behind my pictures, tuck things here and there. Add my foam adhesivce and cut some more strips to comeout to the left of my layout.
I pulled out some frames form the ephemer, simple stores frame packet and pinkfresh studio ones as well and tucked them in here and there. I added my title at the bottom, added a few more of those rubons, I love them by the way! They work so well!! The I pulled those sweet, beautiful sequins and started plavcing them all over my layout until I was happy and then I called this lauyout done! If you liked this layout and want to see a process video of how everything came together, check it out here and make sure you likeand subscribe so youll know when I put out more content. And if you have any questions feel free to ask!! Have a great day!!

Wednesday, September 13, 2023

Waving Hi cards | Cut Cardstock DT

Good morning everyone! I have a fun and quick slimline card for you today.
I used the Cougar Smooth White Cardstock for my card base, along with the portion with the cutouts and for my stamping of my polar bears too. I love this cardstock because I can stamp on it, use my alcohol markers and it stays nice and smooth! And the other color I used is Pop-tone Sour Apple cardstock.
I used my Slim card Basics, creative cuts from Mama Elephant to cut my card out the way I wanted. I popped the white portion with the cutouts up so I could add some dimension and I wanted to make sure the clouds I inked on showed through too.
I added one of my little polar bears to the top hole and one to the bottom. Then I added a banner with my sentiment to the center one and called this card done. I really liked that this was a simple card, but cute! I hope you liked this card and I hope you have a great rest of your week!!

Tuesday, August 29, 2023

My first Slimline cards | Cut Cardstock DT

Hello crafty people!! How are you this morning?? I hope your day is going well and I hope your up for checking out some new cards I made, My 1st Slimline cards actually.... and I'm pretty happy with them, if I do say so myself.
I started with one card. I had never done one of these and of course I would choose one that has soooo may things you have to pop out and then layer back in. But it was totally worth it!! I started with Cougar White Smooth cardstock for the base of my card and then I thought I would also use it for the front portion of this card. I ran it through my sizzix, popped everything out and then moved on to cutting the next few layering parts out too. I wanted to go with a coral color and a pretty teal/blue color. So I chose Pearl canvas texture Aquarium, Wild Salmon and Beetle Black. I used these colors for both cards with a little different look in the end.
I started with black as the farthest back on this card. I then cut the salmon color and then the blue. Once I layered them, I found some little gems in my stash and added them on the end. Pulled two distress oxides out of my stash, one to match the blue and the coral colors I used, so that I could add them to the background on the base of my card. For the white card I used Saltwater taffy on the edges, glued everything down, placed the little black pieces in the latticing. Finished it off with my sentiment and moved on to the next card.
With this one, I started with a black base and black for the base of the front of my card too. I did all the same exact steps on this card, but with a different color order and salvaged patina distress oxide. Along with a different sentiment and colored jewels. I hope you enjoyed these two cards, I have to say I really enjoyed making them and was so happy with the way they turned out, especially being my first Slimline cards I have made!

Monday, August 14, 2023

Pineapple Cards | Cut Cardstock Dt

Good morning everyone!! How are you this monday? I hope your week is starting good! I wanted to hop on this morning to share a few new cards with you that I did. I couldn't help but use this cute pineapple stamp from Concord & 9th. I loved the fact that I could add so much color to it! And I did just that!
I chose the Cougar Smooth White cardstock for my card bases along with what I chose to stamp on. This paper just seems to be able to take the ink from the stamp, along with alcohol markers and distress oxides too. I stamped both pineapples and thought I would try something different with each of them. The one that ended up on the yellow was done with distress oxide inks and I love the way the colors turned out, kind of a bit fall-ish looking, to me at least. To finish that cards I grabbed some of my Light Yellow cardstock, ran it through my sizzix with a embossing folder and then rubbed one of my distress oxides across the raised parts and then cut an circle in it large enough pop my pineapple up in and added my hello sentiment banner and moved on to my next card.
I figured with the first card, it looking fall-ish that I would continue on with that on this card but in different colors. So, I pulled out my alcohol markers and went to coloring in pretty light pinks, purples and some maroons and a bit of a different green too. Since I had went this route with it, I had the perfect purple in my stash to use. I grabbed my Hydrangea purple, ran it through my sizzix as well, cut a circle in it and popped up my pineapple, added my sentiment and called them done!
I hope you enjoyed these cards and I hope you come back to get some more crafty insperation!

Friday, July 28, 2023

I'm grumpy when you're not here card | Cut Cardstock DT

Good morning everyone!! How are you today? I'm doing pretty good! I wanted to share a few more cat cards I made. I couldn't help it, these cats are just too cute!
I started with the I'm grumpy when you're not here card. I grabbed my mermaid lagoon distress oxide with my Surf cardstock and blended some of that from the top down until I liked it. I had already decided I was going to use this sleeping cat on the shelf, so I kind of wanted it to look a little like night time. Once I did that I ran it through my sizzix with my heart die. I added 3D foam to the back and was fixing to put it on a white base, but decided to add some shimmery white splatters and then added it to the base. I had already stamped my sayings so I added a little 3D foam to it, just in the center where it would be over the heart. I added the shelf inside the heart and popped the cat up and then added the cute little mouse down in the corner and moved on to the next card.
I took the heart that came from the out-cut of my last card and covered it with a strip of a bunch of colors; Grape Jelly, Hydrangea Purple, Aqua, Surf, Galax, Light Yellow, Wild Salmon, Shimmer Fruit Punch, and Pink Tutu. I also decided to add a border to this card and I did that with some Aqua cardstock. I popped it up with some 3D foam and splattered a bunch of gold splatters on the card base and border and then added my rainbow heart.
I popped my cute little fuzzy guy up on 3D foam, added a little ball of yarn to him and a little saying. I thought I was done but decided to add a little speech bubble with a cut little fish and called this one done!

Wednesday, July 19, 2023

So Cool Layout | Mercy Tiara Kit Club DT

Good morning, everyone!! How are you doing today?? The week is halfway over, are you happy or is it going to slow?? Well for me, scrapbooking helps a little bit with the wishing that the weekend was here already lol and having a new kit to play with, helps even more!! So today I am sharing my first layout with the June kit, 
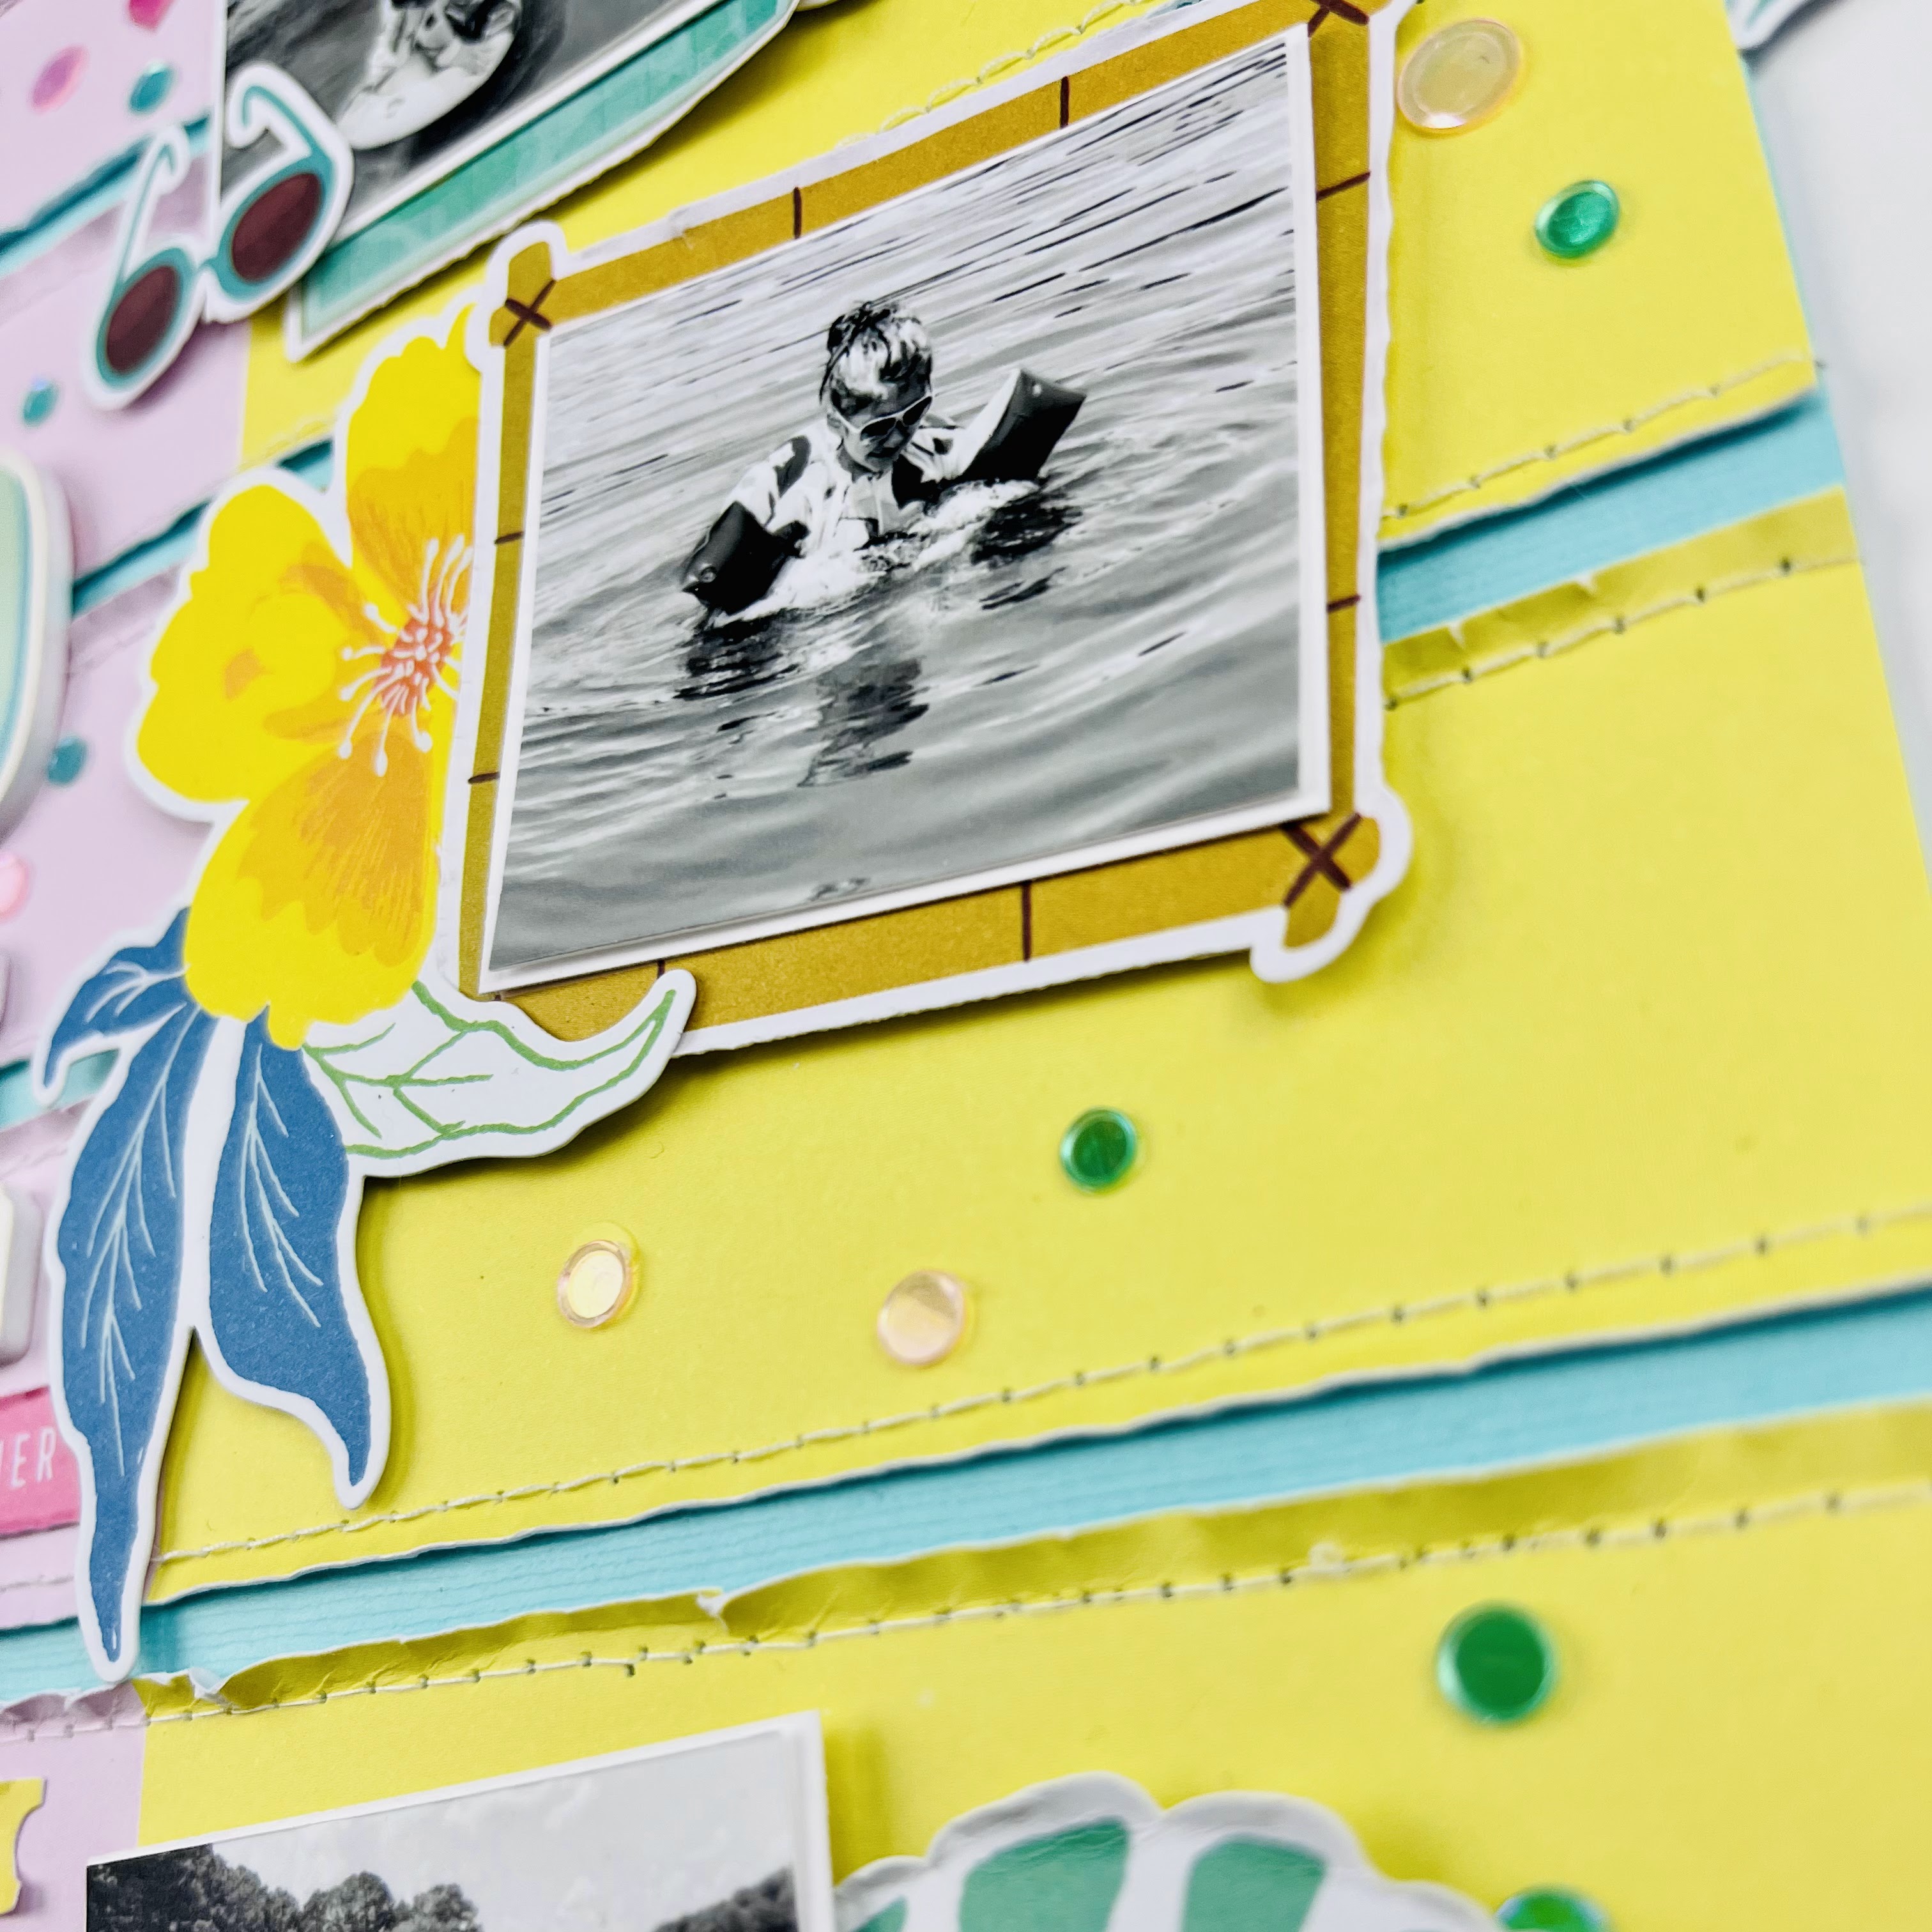
Summer Vibes, from Mercy Tiara kit club. And oh man is this kit soooooo worth it! I went outside of what I normally do, no white background!! I think the only white on this layout is the mat for my photos!
I knew what photos I wanted to use, and that Pinkfresh Studio paper, Sun and Sand just yelled at me!! I wanted to use it as soon as I saw it. So, I grabbed it and started cutting it up. Right into the strips that were on the paper but taking out the white bits. I also love the Patina Bazill cardstock so I figured I would combine them. Honestly the most aggravating thing about this layout was my sewing machine! I ran out of thread in the middle of a line I was sewing and didn’t realize it at first, so I had to try and make sure to hit the same holes when I went back over it! Lol That was completely on me!!
Once I had that all under control, I ruffed up the edges of the paper with my nails and moved on to adding my photos. I pulled out the Simple Stories Retro summer bits and pieces along with Pinkfresh Studios floral ephemera and started to add those pieces as layers behind my pictures.
I added my title after that. This was an easy one and after making it a priority with last months kit to use the foam stickers, it was easy to do with this one too. I thought So Cool worked great for this little miss and the color was perfect too! After the title I added a few word strips and of course those beautiful sequins and called this layout done!
Make sure to follow Mercy Tiara kit club on Instagram and join the facebook group too and share your projects!! You can also head over to the Mercy Tiara site and grab this kit and some of the past ones too!

Monday, July 17, 2023

Blessed layout | Mercy Tiara kit Club DT

Good morning, everyone!! How was your weekend? Mine was pretty good, had to deal with some weather again so that sucked but were all here and that’s all that matters. I am still playing with the Mercy Tiara June kit, Brighter Days. I have been absolutely loving this kit!! I also thought I would use another one of the cutfiles you get when you get your kits too.
I decided to go with quite a few photos for this layout, 8 actually. Lol I went ahead and made them into photo strips so I could stack them a little and make sure to get them all on my layout without it being to over whelming. I sent my white cardstock through my silhouette, added a LOT of foam adhesive to the back of it and then backed it with that beautiful Pinkfresh studio, Spring Vibes, Soak it up patterned paper. I love this paper!! I rotated the paper so that the yellow part looked like it was coming out from behind where I wanted my photos to go.
I added that to the right side of my layout and then went to working on my photos and the clusters that I was going to put around them lol
I pulled bits and pieces from pretty much every ephemera pack or sticker sheet there was in the kit and ephemera add on. I had fun cutting things in half and sliding them here and there, layering other bits on top. I added foam behind the photos that were on the left and then added some foam stickers there too.
Once I had everything where I wanted, I pulled out my typewriter and did my journaling. I cut that all down and added it to the left side of my layout and then decided I wanted to add some of the enamel dots and then I called this layout done!
V√I hope you enjoyed this layout and I hope you come back and see what else I come up with. Make sure to head over the Mercy Tiara Kit club site, there are some of this kit left and you can also grab the new July kit, Summer Vibes!! Totally worth it!!