Showing posts with label Stamping. Show all posts
Showing posts with label Stamping. Show all posts
Wednesday, November 29, 2023
Waving Hi card | Cut Cardstock DT
Good morning everyone! I hope you're having a good week, it's almost the weekend!! Well this is my last post for Cut Cardstock and I thought I would share a cute polar bear card with you guys I made.
Seriously, I think these little guys are so cute! This stamp is the BB Polar Bear Pals from My Favorite things, so I used those and I went with a blue and white color scheme for the whole card, as you can tell. lol. I used Cougar White Smooth CardStock for the base of my card as I normally do. Then I grabbed a piece of Surf. I cut it slightly smaller than the 4 1/4 x 5 1/2 card base and ran it though my sizzix with a 3E embosser.
I cut a 4x5 1/4 piece of white to have as my background, cut a few hills and then pulled out my cloud stencil. I Grabbed my tumbled glass distress oxide for my clouds. When that was done I went to stamping my bears, their fish bucket and my sentiment on another sheet of Cougar White Smooth CardStock.
I pulled out my Tri Blend alcohol markers by Spectrum noir, adding some color to the polar bears scarfs, a little shading to their bodies and of course a little color to their feet. I also colored in the bucket of fish.
At this point all there was left to do was to add everything to the card. I placed the hills where I wanted them and then decided where I wanted mhy Polar bears and their bucket of fish. I had my sentimit, but I thought with it being on white that it blended in to much. So I grabbed my tumbled glass distress oxide again and inked up the edges. Popped it up on some foam and placed it at the bottom left of my card and call it done!
I hope you enjoyed this card and the cute little polar bears!!! I hope you have a great rest of your week!!
Friday, September 29, 2023
Halloween coffee Panda cards | Cut Cardstock DT
Good mornig everyone!! How are you doing and are you ready for fall or haloween?? I sure am and have been. But here where I live we keep getting teased with fall but it keeps getting hot again :(.
Well this morning I wanted to share with you two cards that I made and ones a shaker!!
I used my normal base for my cards, Cougar Smooth White cardstock, I pulled the Halloween American crafts paper pad I got from Cut cardstock and matched some of the cardstock to it.
I ended up pulling Wedding cake, Gunmetal, and Orange Zest.
Once I had everything picked out and matched, things came together quite easily. I ran some of the Halloween paper throught my sizzix to cut out the coffee cups, the first one I turned into a shaker with some cute little punkins I had in my stash. I had stamped out some cute little pandas in the beging and I added one to the center of my shaker.
once I had the shaker put together I added a piece of patterned paper to the front of my card base and moved on to my other card.
This one wasn't a shaker, so it came together even faster. I went ahead and cut another coffee cup out, inked my panda with some distress oxide and drew some little stitches on him like Frankenstein. I inked the edges of my coffee cup pieces, glued everything together. Stamped boo on the coffee cup sleeves and call these cards done! I hope you enjoyed these cards and if youd like to see a bit more you can watch a quick video here on my Tiktok.
Monday, August 14, 2023
Pineapple Cards | Cut Cardstock Dt
Good morning everyone!! How are you this monday? I hope your week is starting good!
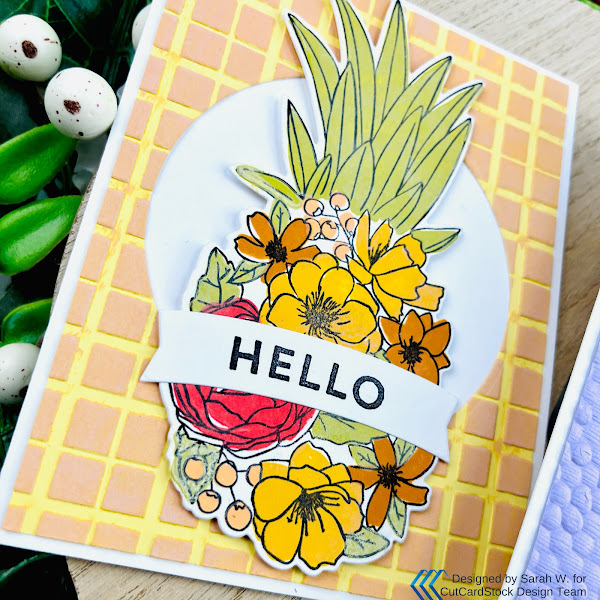
I wanted to hop on this morning to share a few new cards with you that I did. I couldn't help but use this cute pineapple stamp from Concord & 9th. I loved the fact that I could add so much color to it! And I did just that!
I chose the Cougar Smooth White cardstock for my card bases along with what I chose to stamp on. This paper just seems to be able to take the ink from the stamp, along with alcohol markers and distress oxides too.
I stamped both pineapples and thought I would try something different with each of them. The one that ended up on the yellow was done with distress oxide inks and I love the way the colors turned out, kind of a bit fall-ish looking, to me at least. To finish that cards I grabbed some of my Light Yellow cardstock, ran it through my sizzix with a embossing folder and then rubbed one of my distress oxides across the raised parts and then cut an circle in it large enough pop my pineapple up in and added my hello sentiment banner and moved on to my next card.
I figured with the first card, it looking fall-ish that I would continue on with that on this card but in different colors. So, I pulled out my alcohol markers and went to coloring in pretty light pinks, purples and some maroons and a bit of a different green too. Since I had went this route with it, I had the perfect purple in my stash to use. I grabbed my Hydrangea purple, ran it through my sizzix as well, cut a circle in it and popped up my pineapple, added my sentiment and called them done!
I hope you enjoyed these cards and I hope you come back to get some more crafty insperation!
Friday, July 28, 2023
I'm grumpy when you're not here card | Cut Cardstock DT
Good morning everyone!! How are you today? I'm doing pretty good! I wanted to share a few more cat cards I made. I couldn't help it, these cats are just too cute!
I started with the I'm grumpy when you're not here card. I grabbed my mermaid lagoon distress oxide with my Surf cardstock and blended some of that from the top down until I liked it. I had already decided I was going to use this sleeping cat on the shelf, so I kind of wanted it to look a little like night time. Once I did that I ran it through my sizzix with my heart die. I added 3D foam to the back and was fixing to put it on a white base, but decided to add some shimmery white splatters and then added it to the base. I had already stamped my sayings so I added a little 3D foam to it, just in the center where it would be over the heart. I added the shelf inside the heart and popped the cat up and then added the cute little mouse down in the corner and moved on to the next card.
I took the heart that came from the out-cut of my last card and covered it with a strip of a bunch of colors; Grape Jelly, Hydrangea Purple, Aqua, Surf, Galax, Light Yellow, Wild Salmon, Shimmer Fruit Punch, and Pink Tutu. I also decided to add a border to this card and I did that with some Aqua cardstock. I popped it up with some 3D foam and splattered a bunch of gold splatters on the card base and border and then added my rainbow heart.
I popped my cute little fuzzy guy up on 3D foam, added a little ball of yarn to him and a little saying. I thought I was done but decided to add a little speech bubble with a cut little fish and called this one done!
Friday, May 12, 2023
Short Arms, Warm Heart card | Cut Cardstock DT
Good morning everyone!! How was your week? Happy it's friday? Well I am!! I want to get to some more crafting!! Speaking of crafting, I wanted to share another card with yall that I made. I sure have been on a card making kick lately, but that's ok lol.
I make the base of my cards out of Cougar white smooth cardstock, I also do all my stamping on the same cardstock as well. I do that because I love the way the stamping comes out, clean and crisp, along with the way the cardstock takes the distressed oxides in this case, and alcohol inks in other cases.
When I had stamped out my dinos, I pulled my glass mat and started to play with distressed oxides and my water brush, until I liked the way the dinos looked. I set them aside to dry and pulled my heart background die. I played with different colors to go behind the die cut and settles on Light yellow. I wanted a little more color so I pulled my mustard seed distressed oxide and blended it from the top and faded into the cardstock color.
Putting the die cut on the Light yellow cardstock and adding it to the card base, I didn't like my dino just sitting here with nothing, so I pulled some Aqua cardstock and cut out a circle that was large enough to put my dino on and make it have a home.
I added its little tree, made sure some of the grass could fit behind the dino and then popped the dino up on some 3d adhesive and added my little sentiment and called this one done!
Thursday, April 27, 2023
Let's hang out Sloth card | CutCardstock DT
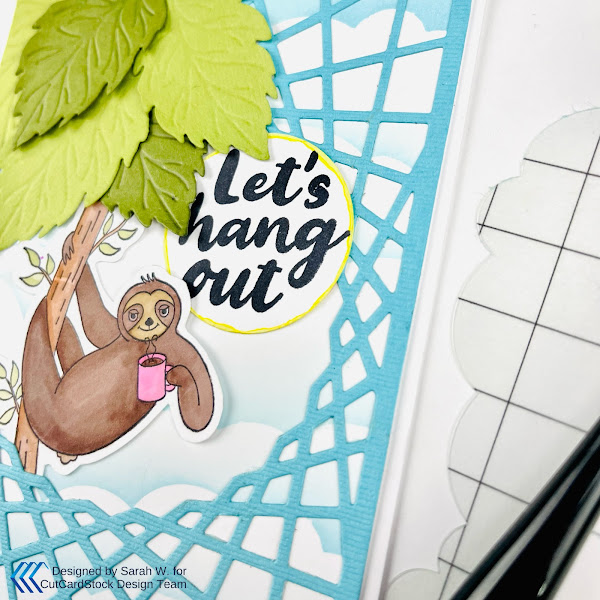
Hello everyone!! How are you doing today?? Well I wanted to share a new card that I made, with a sloth! I love sloths!! lol I have to admit, I love playing with cards with the cardstock from the shop. I have been playing with everything I can think of on this cardstock. But with this card, I used the white Cougar Smooth Cardstock, I used watercolors on it for my sloth, along with distressed oxides on the background for clouds.
Once I had finished painting my sloth, I realized that the branch wasn't long enough. I knew I wanted to add a top to it so I grabbed two greens, Jelly Bean Green and Galax, and cut out some leaves. I added them to the top so it looked a little more like a tree.
After I had that done, I decided that I wanted to add some more blue too. I riffled through my dies in my stash and found one I decided I wanted to use, pulled Surf and ran it through my sizzix. I trimmed the end of the limb from the sloth branch. I tucked it behind the blue die cut and then added the leaves to the top.
I popped a circle out of the cardstock and stamped Let's hang out on it. I used my squeezed lemonade distressed oxide around the edges and popped that on to finish off my card.
Tuesday, October 4, 2022
Sunshine Wanted Layout | Clique Kits
Good morning everyone!! I have a 12x12 layout to share using the Wildflower kit. One I love this kit! There are so many pretty papers and all the embellishments!! But for this layout I had to scrap a picture of one of my pups. It was a rainy day and he didn't want to go outside and he just moped around the house. He's so goofy.
He looks so mopey in this picture I kind of wanted to stick with more blues, but decided half way through that I wanted to add some of the yellow for some pops of color. This layout is really simple, but it was so fun to play with. I pulled a stamp, Flowers Always Add on, along with my watering can archival in and stamped on the upper part of my layout. Then I grabbed my Chartreuse stencil butter and watered it down and splattered it around on my layout, trying to keep it more towards the center of my layout so that it would show from behind where I was putting my layers.
I sat my background to the side to dry and started to play with the papers from the kits. I found a 3x4 pocket card that I decided to do my journaling on, so I knew that I wanted the first layer behind my photo to be larger but not to colorful. So I cut a large piece that fit both my picture and journaling card. I popped both of those up on foam adhesive and added them down. Made a mistake there. I hadn't added my stamping, but it worked out.
I pulled out a few of the other 3x4 cards and cut a label out of one to add in my layers, I didn't want to waist the rest of the card and thought the color of it worked great for adding to another layer, so I tucked it in at the top and off to the right side. It was all looking a little light at this point so I grabbed a large tag from the kit and cut it in half and added it to the right and left of my layers. I was liking the way it was looking so far but this was when I decided to add in some of those pops of yellow. I pulled a sheet of paper from the kit and fussy cut out a few strips of the scalloped strips and tucked them in at the bottom of my layers.
At this point I wanted to start adding more of my embellishments, so I dug in and pulled all sorts of pieces to tuck here and layer there. I found that yellow tab and added it onto my journaling card so that it would hide some of the writing that was on it that didn't really work for me, along with a piece if a tag from the kit as well to cover some more. At this point I added my journaling and then decided to pull a stamp from my stash and add a little rain cloud. I popped on my title and that was it for this layout.
I hope you enjoyed this layout!!
Wednesday, May 1, 2019
May Planner / Paper Sweeties DT
Good morning everyone!!
My name is Sarah and this is my 1st post for Paper Sweeties.
I'm here to share with you some of my May planner. I play with pretties in my planner before the month starts and then as the month goes I add pictures in and journaling about things that go on.
I know some of what were doing this month, Like I said I use my planner like everyone else and plan things, but add so much more as the month goes along. But since I knew some of the things we had planned for this month I used Let's go on an Adventure from Bella Blvd and thought I would give y'all a little sneak peek of the soon to be released products available on 5/15, Camper.
I love this new set and you will be seeing so much more of it!! Make sure you check out the New release on the 15th!! So cute!!
I love the different sets of Planner series stamps that I got to use. I can add things for my design team stuff, Due dates and so much more!!
I hope you enjoyed my planner spreads I shared today, throughout the month I will be sharing updated pictures of my spreads with pictures and more added!!
Links to Paper Sweeties products used:
Subscribe to:
Posts (Atom)


