Showing posts with label memory keeping. Show all posts

Wednesday, November 29, 2023

Let it Snow Layout | Mercy Tiara Kit Club DT

Hey everyone!! How are you doing today? Were halfway through the week, woot, woot!! Well, I thought I’d share a layout with you really quick that I made using the joy kit from Mercy Tiara kits club. This kit is beautiful and there are links below where you can go and grab it too.
I did a little different with this layout and pulled mostly blues, whites and a little bit of wood grain too. I had fun with a little bit of mixed media, a stencil and a bit of layering!
There is a full video up over on my Youtube channel if you’d like to see how this whole layout came together! Thank you for coming by to check it out! I hope you come back to see what else I come up with! You can find your Mercy Tiara Kits here

Wednesday, July 5, 2023

Discover | Mercy Tiara Kit Club DT

Good morning crafty people!! I’m here this morning to share another new layout with you using the Mercy Tiara Brighter days kit. This kit just keeps giving and giving! I have been having so much fun playing with it, and I still have more projects to share!! This layout is about me, and all the journaling is hidden, but I have been trying to be better about writing down the story, even if everyone else can’t read it. I really started this layout with the picture, the foam sticker title and a piece of white cardstock.
I cut multiple flowers out from the cut files you get when you purchase your kit, I thought since I was doing a layout about me, I could use the pretty flower cut files and flower paper too lol. I pulled the floral paper, it’s from the Flea Market collection from Simple Stories, You’re my fave paper. I knew I wanted to use that, come on its soooo pretty!! Then I pulled different papers that I thought would go with it, some other patterned papers and some that I considered plain or can be used as one for me at least.
I added layers behind my photo, after adding a white boarder of course. I added adhesive foam for dimension and played with the papers till I got them just how I wanted them. I ran some of them threw my sewing machine, added more 3d adhesive and ruffed up the edges. I tucked the pretty flower cut file behind my layers there so that some of it would be sticking out and showing. At this point I hadn’t adhered down my photo and its layers.
I cut a 3-inch strip of that beautiful floral paper and added it to the bottom of my layout and ran it through my sewing machine. I played with the same papers form the ones I used behind my photo; I used the same ones on the bottom. But I didn’t stick them down right away. I decided I wanted to play with a little mixed media and get a bit more of that darker teal color on the page. So, I did. I added a “puddle” behind my photo and its layers and hidden journaling, then I added some to the bottom of the layout where I had picked my title to go.
I added some splatter around the layout too, waited for everything to dry and then stated adhering things down! I tucked some labels behind my title and in those layers I had already made, I slid some foam florals in up by my photo and a cute little camera too!
I tucked in some of the pretty vellum leaves, a life is beautiful banner to the right of my photo, and I decided I was done with layout. I have a question?? Do you show all your journaling where everyone can see it, or do you hide some of yours too? When it’s something personal? I hope you enjoyed this layout, and I hope you come back to check out more!! Make sure to check out my Instagram for more insperation, along with my Youtube TikTok facebook and the Mercy Tiara Facebook Group too!!

Monday, July 3, 2023

The Best Day layout | Mercy Tiara Kits DT

Good morning crafty people!! How are you this morning? I’m doing pretty good, getting crafty lol I wanted to share another layout with y’all using the Brighter Days kit by Mercy Tiara Kits. I am seriously loving this kit!! There are two papers now that I have completely cut up, but having the paper add on made it easier for me to do! I knew exactly what picture I was scrapping for this layout so grabbing papers was where I needed to start. And I wanted bright colors, so no white background this time.
I had a hard time with this one, I love all the papers in the kit, but I finally decided on the Tell the story paper. I though the light pink would be nice, and I could use bolder paper on top without it being TOO busy. I have had a problem cutting up the flower paper, Your my fave, but I decided to go with it and ripped it down! I have an issue with wasting stuff, so I flipped over the extra piece and slid it under the flower paper and loved the way it looked so I cut another piece down and slid it under the bottom side too.
So, for me the main part of this layout was done. I knew where my photo was going and that left everywhere else to put my title, journaling and all my pretties!
I pulled out the container that I put all my fussy cut Woodland Grove gold foiled paper and started sliding the florals behind different layers, behind my photo and then at the bottom right end too. I pulled out my typewriter and did my journaling, this way I knew how much journaling I had and where I needed to put it so I could add more to my layout.
I have been trying to finish off the foam sticker sheet cause they are usually hard for me to use, so I had picked that to be something I was shooting to finish completely with this kit. So, I picked my title and placed it. There was a good area for it and the white around it made it stand out a bit. I popped my photo up and slid a few more flowers under it, part of a frame and a cute little word ephemera piece and moved on to tucking things here and there.
I didn’t fully glue down my flowers that I’d fussy cut cause I wanted them to stick up a bit and I also still wanted the option to slide a few things under them or in them too. The Pinkfresh vellum pieces were too cute so those are a few of the things I slid in with my fussy cut florals. I added some word stickers here and there that when with my layout and that was it for this layout! I hope you enjoyed this layout and I hope you come back for more inspiration! Make sure to check out the Mercy Tiara kit club site too so you see the past kits, what’s still available and what the new kit is!!

Wednesday, June 28, 2023

Yes, PLease layout | Mercy Tiara Kits DT

Good morning crafty people!! How are you today?! Its mid-week, halfway to the weekend and oh man am I looking forward to that! Well on another happy note, I’m here today to share another layout for the Mercy Tiara kit club. This is my second layout for the design team,using the 
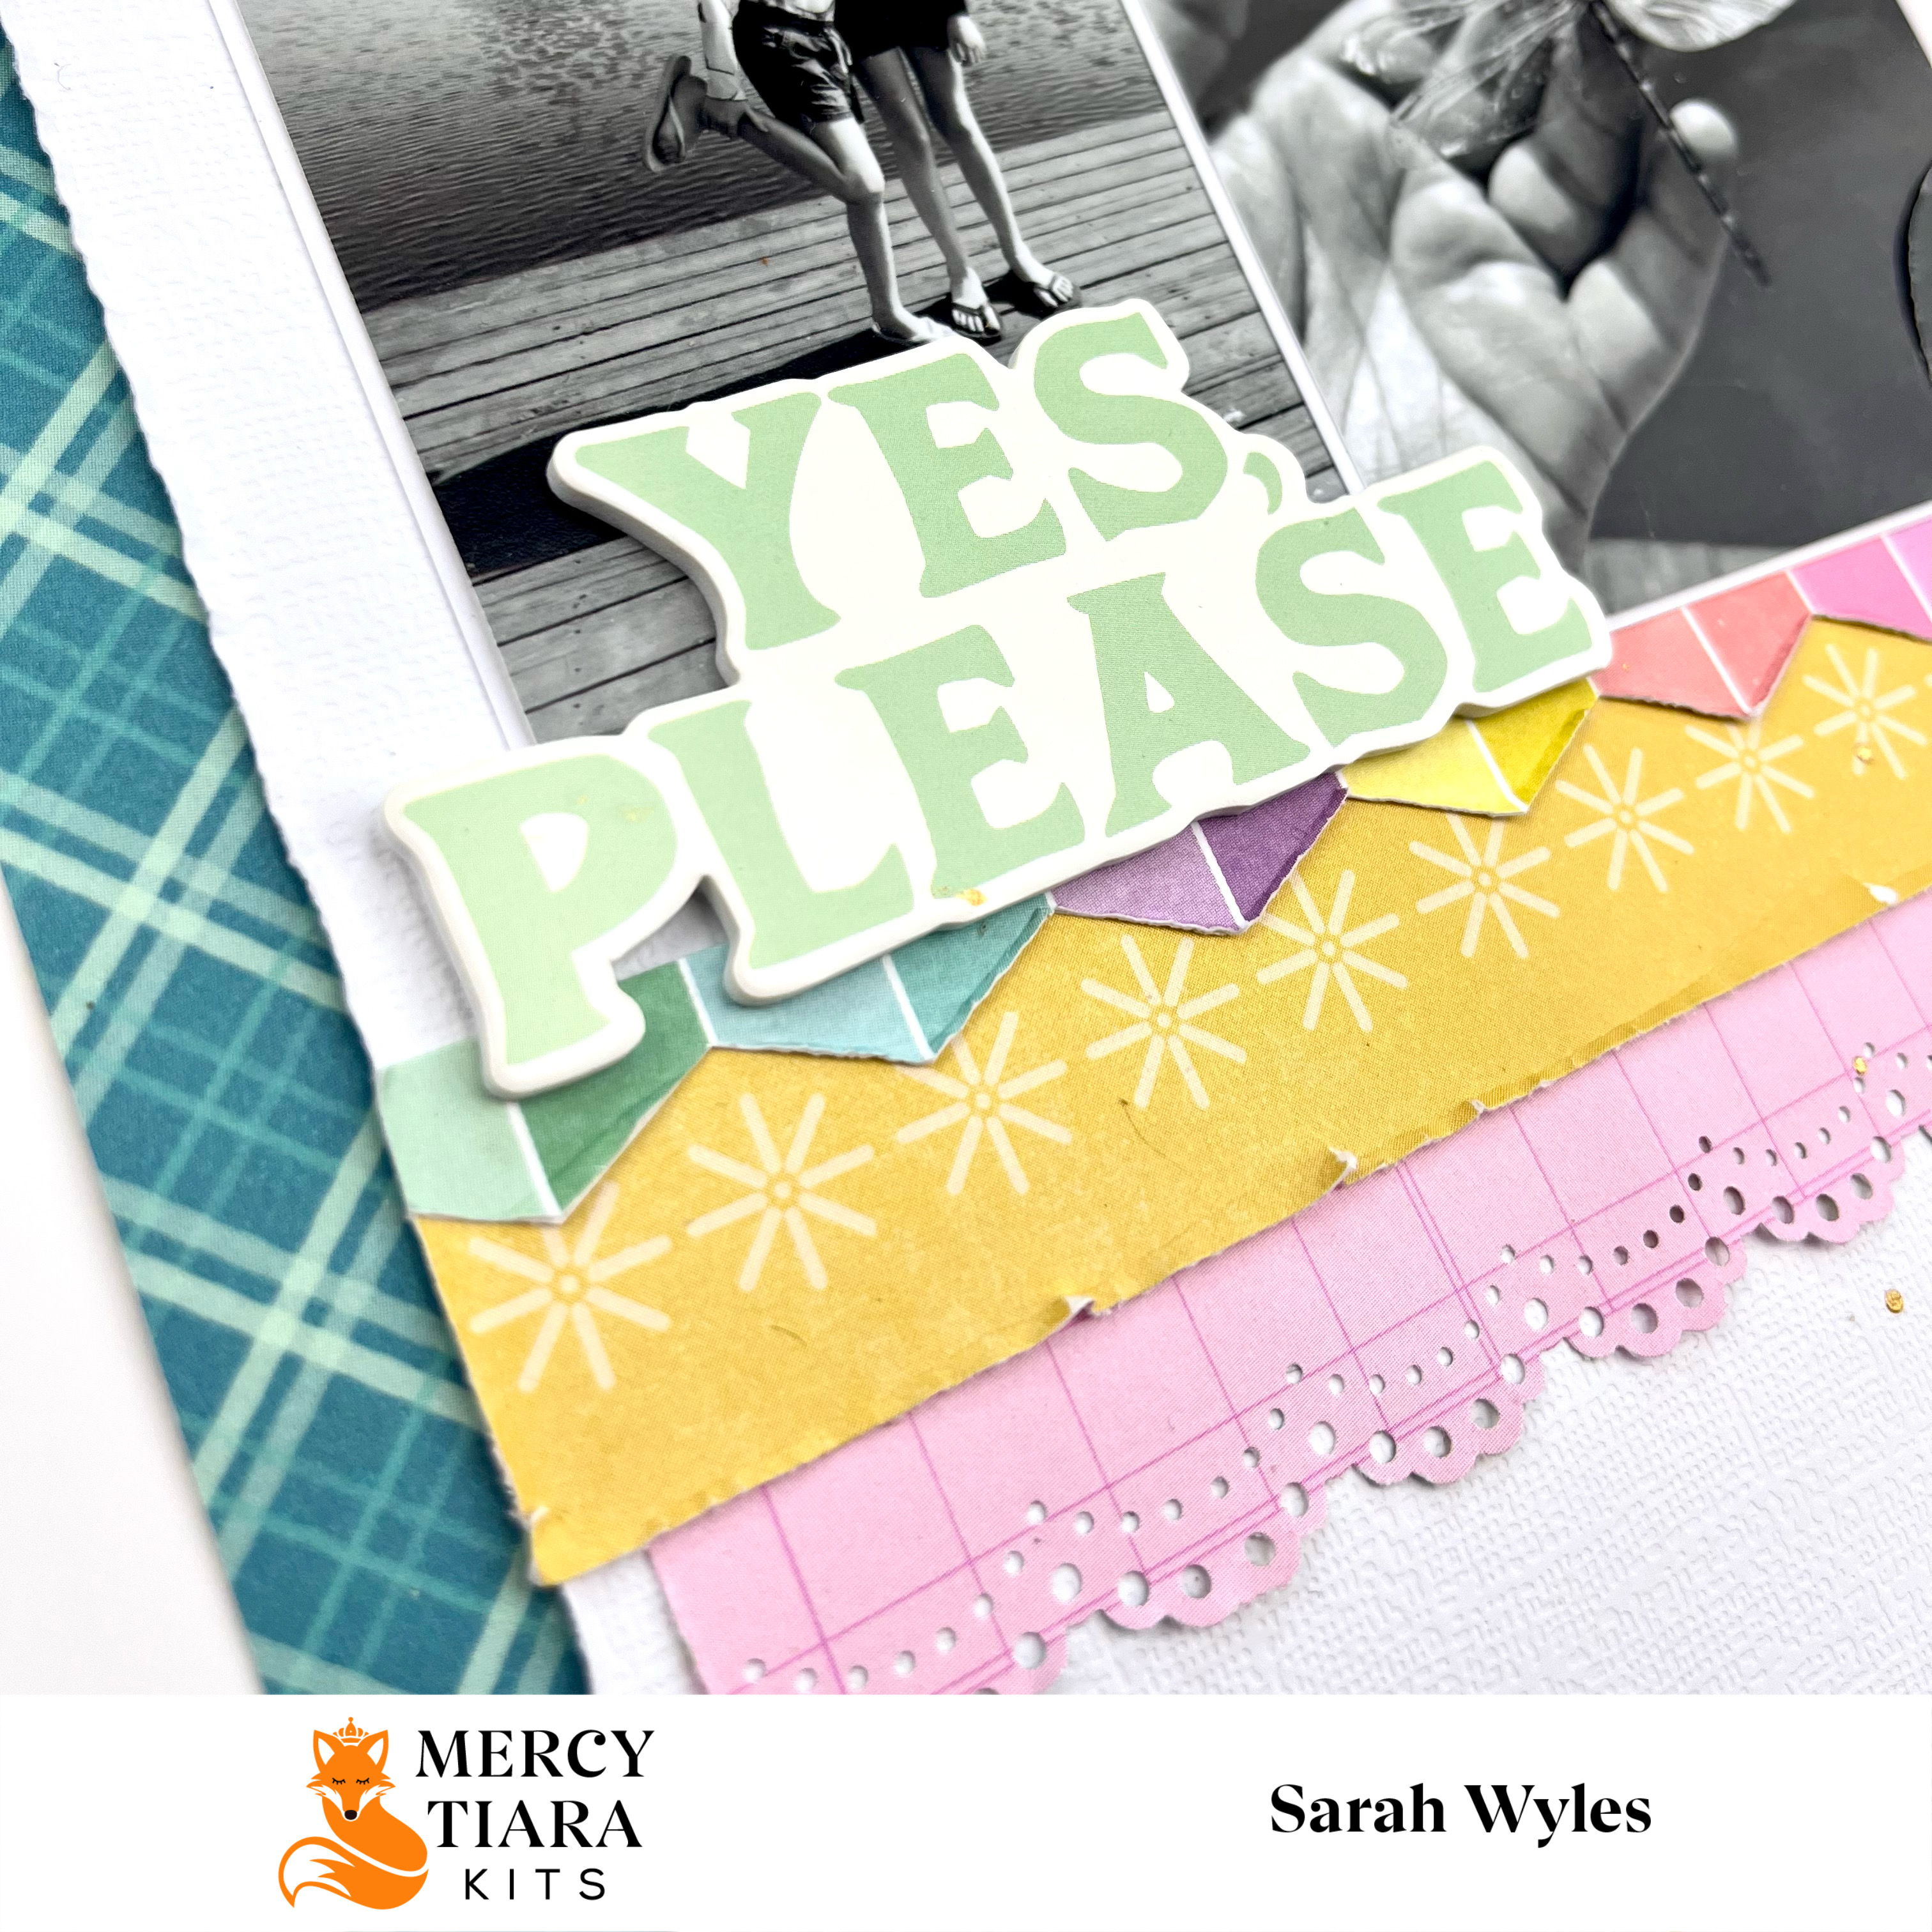
Brighter Days kit and I already have some fun summer photos and they go perfect with this kit!!
I started this layout with my pictures I chose, my white cardstock background and the plaid for my boarder. I decided up front I wanted a boarder on this one, I trimmed my white cardstock down and added the boarder up front. I knew I wanted to use the Pinkfresh Studio paper from the delightful collection called Full Color. It’s so bright and pretty, kind of reminds me of Q-bert lol, showing my age! But I didn’t want to use to much cause it’s so bright, I’ll get there!! I pulled other papers that I thought I would use.
I backed my photos with more white cardstock, decided I didn’t want a bunch of layers behind my photos, so I started to cut strips. Fussy cutting the edges of the Full Color paper, putting another strip through a punch from my stash and then added a few more and making sure I had some for the bottom of my layout too, so I could make a cluster there too.
Like I had said, I’m really trying to use the foam titles from the kit, so I had pulled the Yes, Please and used that for my title. I placed it to the left of my layout, on the picture of my girls after I had figured out how I wanted my little paper strips.
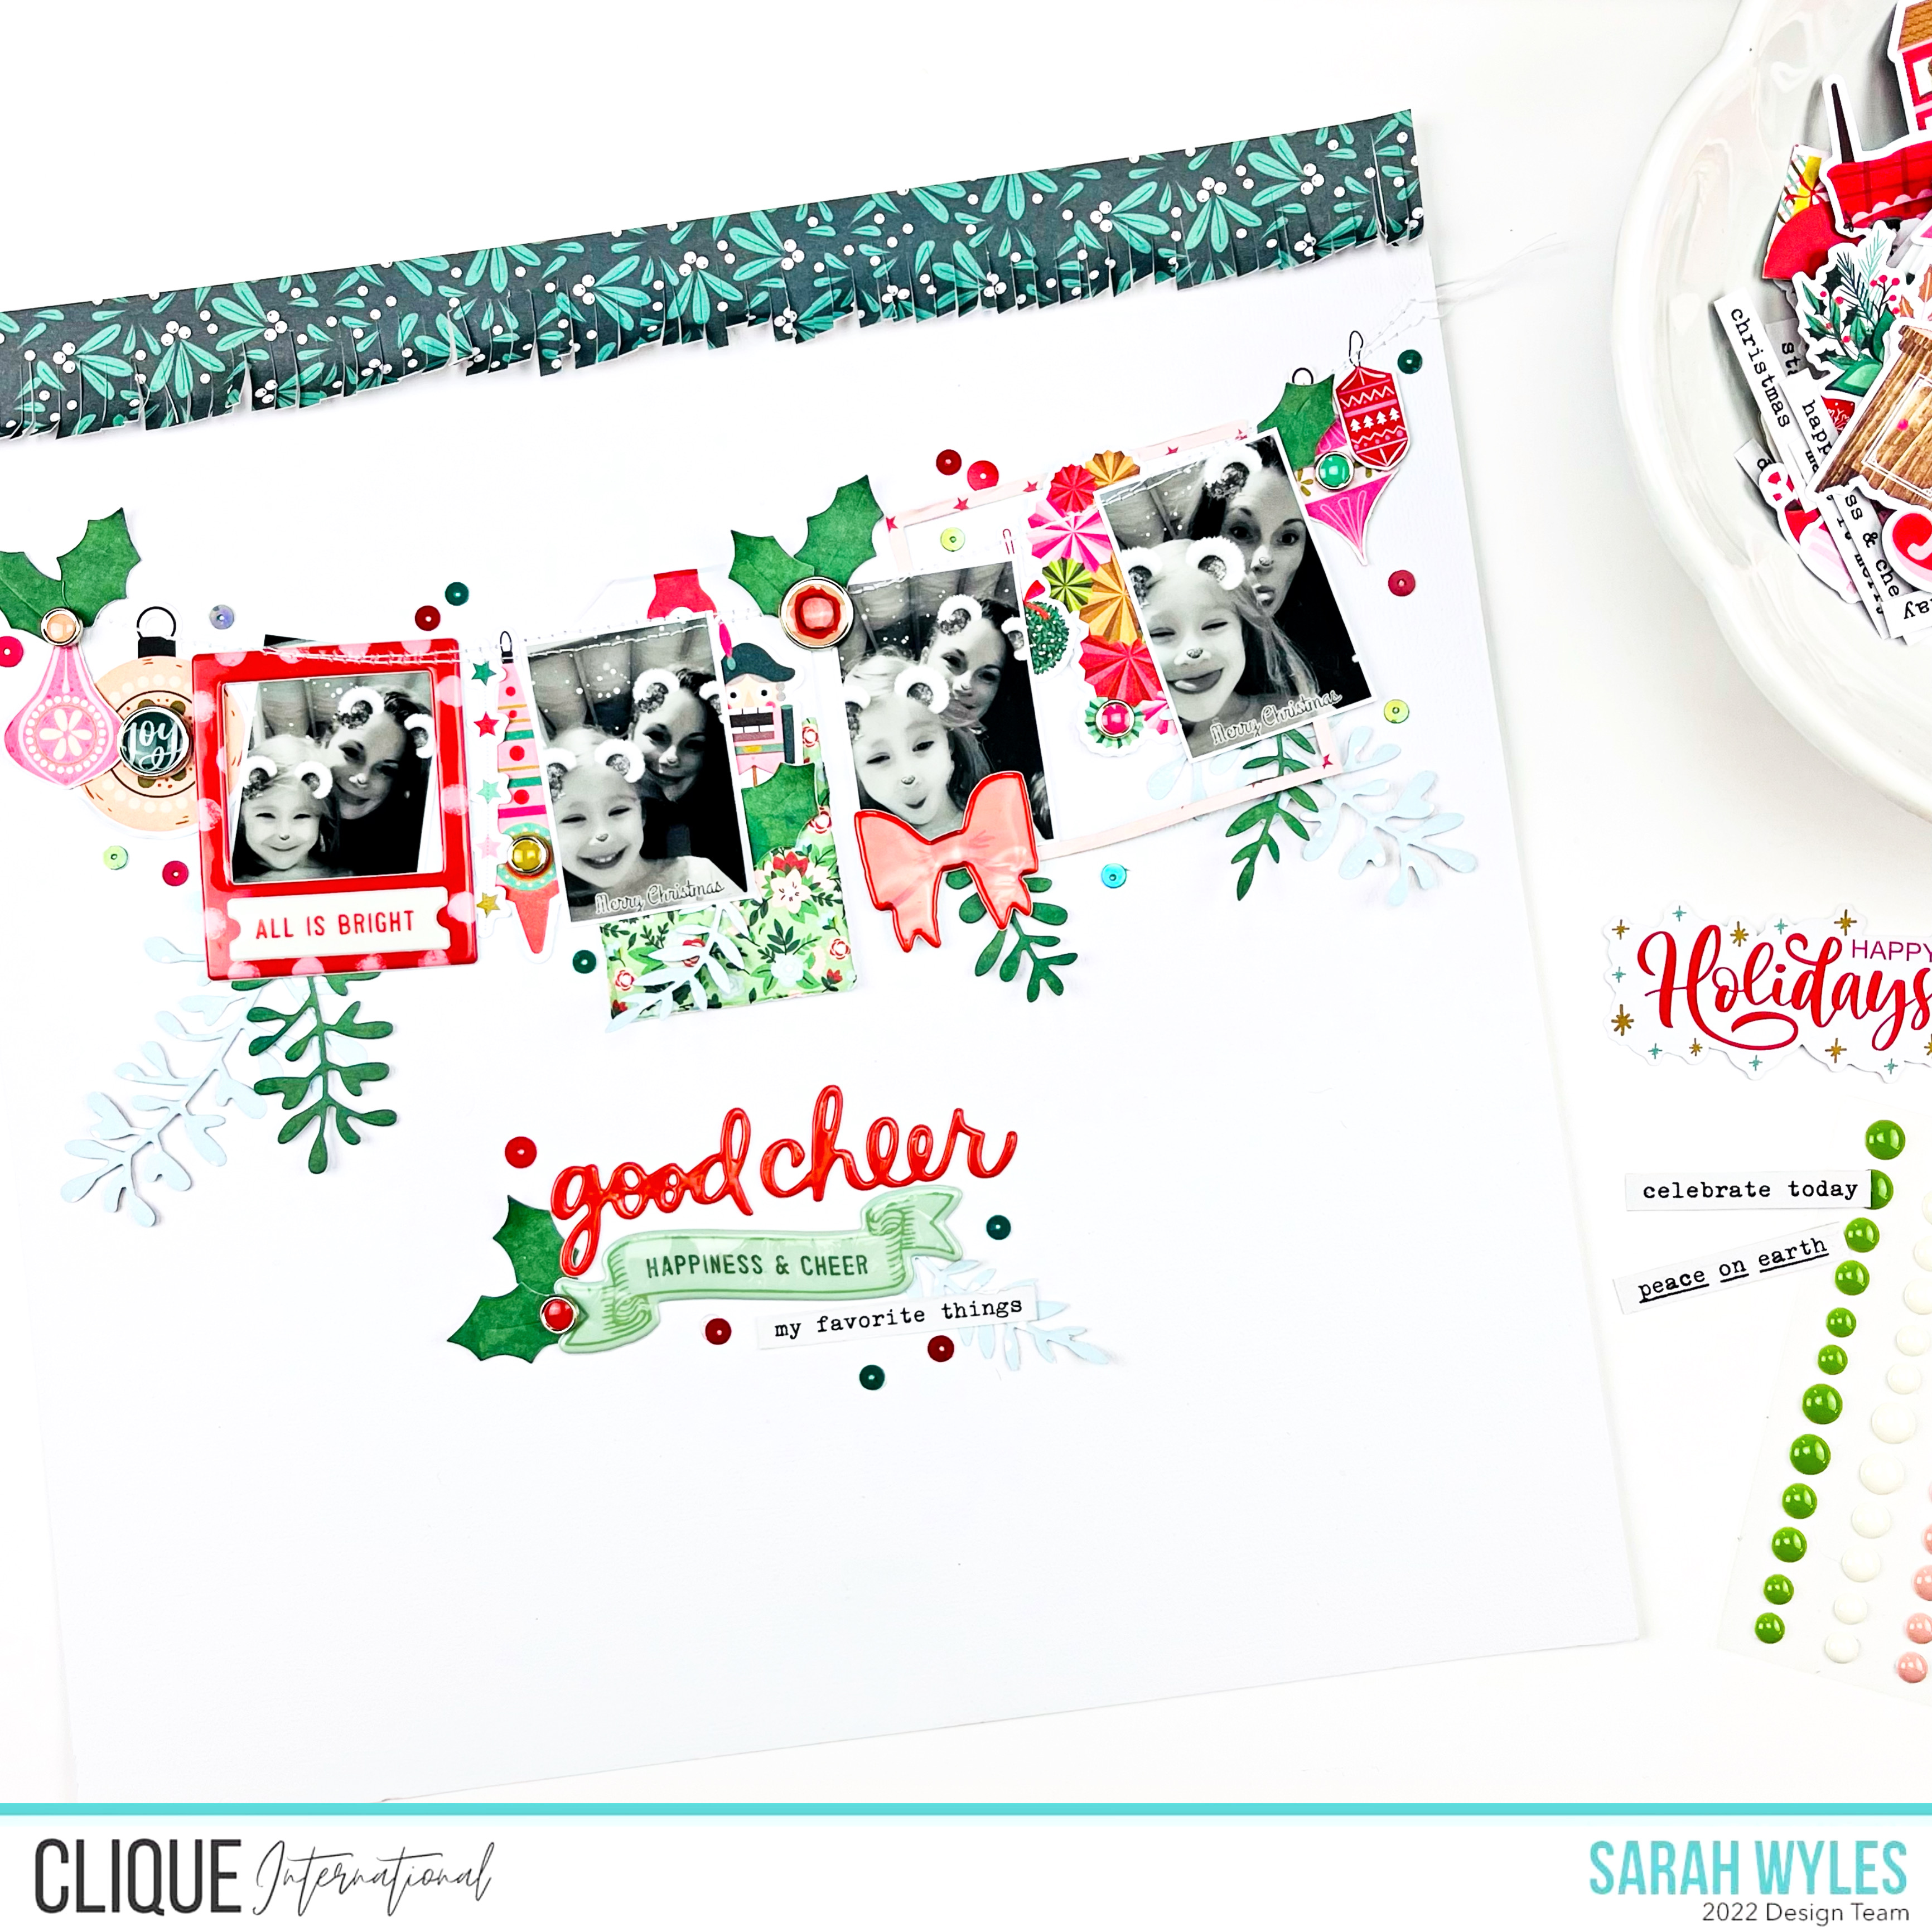
Then I pulled out the embellishments from the main kit and the ephemera add on and started pulling things I thought I would use. I have to say, I also did some fussy cutting from 2 papers in the kit. I ended up with quite a few round pieces I can use and a whole page of labels!! And I love labels!! Lol I slid a few of the circles, plates lol, behind a tag that said this, tucked a label in with my strip layers and moved onto the bottom right corner for my cluster.
I added pap-er strips to the bottom right, along with some circle stickers, labels, and a few other ephemera pieces. I decided I wanted to add some of those pretty gold butterflies and sequins. I added those, splattered some HeidiShine and called this layout good! I hope you enjoyed this layout, and I hope you come back to check out more!! Make sure to check out my Instagram for more insperation, along with my Youtube TikTok facebook and the Mercy Tiara Facebook Group too!!

Wednesday, June 21, 2023

Good Stuff Layout | Mercy Tiara Kit Club DT

I'm so excited to be sharing my 1st layout for the Mercy Tiara Kit club design team!!! I have to say that both of the kits that have been released have been amazing!! But today I will be working with the Brighter Days kit. This kit is full of Prinkfresh Studio, Simple Stories and Paige Evans and they all go together soooo well!! Sorry have to sing paraises where there due! Not only that but when you get your kit or kits you get cutfiles too!! I'm actually using one on this layout today.
I'm not going to go into a bunch of detail here on the blog since I have a youtube video up of the whole process, But I had fun with this one and I have a bunch more coming with this kit!! Make sure to head over to youtube and check out the video and make sure to head to the Mercy Tiara Kit shop and chekc out the kit too!!

Friday, December 23, 2022

Good Cheer Layout | Clique kits DT

Hello everyone!! I wanted to pop on here this morning and share a new layout I made using the beautiful Miracle on 34th street kit. This kit is just so pretty and has so many bits and pieces to it! I picked out my photos of me and one of my girls, printed them in a photo strip and then cut it apart because I decided I wanted to do something different.
I have some garland around the house and I liked the look of it being draped around, so I thought I would kind of treat my photos the same way. And of course, add a bunch of pretty pieces. I lightly drew a curved line on my white cardstock, laid my photos out and then started digging through my kit.
I pulled a bunch of ephemera out, fussy cut some things out and then ran some paper through my sizzix and then started to play with where I wanted things. When I finally decided where I wanted things, I tacked them down lightly with my tape runner. Then I dug back in to all the things I had pulled out, to see if there was more that I wanted to add. And of course there was.
I pulled out the stickers from the kit and decided I wanted to add a frame to one of my photos. At this point I decided to run my layout through my sewing machine. Making sure everything I already put down was secure and then I moved on to the things I had die cut. I tucked some of the longer branches under some of my photos and then added some of my holly leaves along the line I had sewn. I pulled out the self adhesive brads and added some of them here and there. And then moved on to my title.
I pulled out some of the stickers, words and that cute banner piece. I fussy cut a few word strips from one of the papers and added it too. Tucking a few of the holly leaves to one side and adding one of the longer foliage to the other side. I didn't like that my layout had nothing at the top of bottom, so I decided to cut a strip from one of my papers and use my fringe scissors on it and add it to the top of my layout. I wanted a little something more, so I went and dug through my stash and found some of my sequins from past Clique kits and sprinkled them around my layout. And that finished this layout for me. I hope you enjoyed this layout!

Tuesday, November 29, 2022

Oh Happy Day | Clique kits International DT

Good morning everyone! Well I don't know about where you are in the world, but our fall has been interesting. I was wondering if I was going to get any fally pictures and that still remains to be seen. Now, we have had freezing weather and then back to warm but we will see lol. I took my girls out for a day of fun on ne of out "Fall" days and we had a blast. Fed ducks, ate lunch at a park and went and checked out a cool old mill and that's where these photos are from.
I love the kit that I chose to use for this layout. It's the Peaceful Heart, Artist remix kit. The colors in this kit are just so beautiful and I am completely drawn to right now. I have also been in a really weird place in my scrapbooking, where I am not measuring anything when I scrapbook lol. With this layout, I started with little square and rectangle pieces that I had left over from another project I did. I decided to cut those into leaf shapes and use my scoring board and score them so they had some dimension to them.
I had already added a small white mat to my photos and stuck them together how I wanted them, so once I had the leafs done, I started sliding them under my photos. I realized, yep I'm going to have to add some dimensional adhesive to make it all sit right lol. So, I did that and then decided to add in the wood grain tag and pop the piece that would have been hidden behind the photos, to the bottom left of my photos.
After getting the photo cluster all put together, I grabbed a few of the paper strips I had cut randomly and chose the ones I wanted to use on my layout. I had already placed my photo cluster in the center of my layout, so I decided to add the paper strips on the left and right of the layout.
I added my journaling behind my photos, so that's not visible too yall, but to finish off my layout, I went through my ephemera form the kit and pulled a few butterflies and a cute little bee. Along with one of the cut apart papers, I cut out my Oh happy day and used it for my title. I fussy cut a few leafs out from one of the papers in the kit and tucked them here and there as well and then call this layout done. I Hope you liked this layout and I make sure to head over to the Clique Kits shop and check out all the pretties there!!

Saturday, November 26, 2022

Halloween Layout | Clique Kits International DT

OK, I know. Thanksgiving just happened and I'm still sharing halloween layouts lol. But I don't think I ever scrapbook in order of season or holiday lol. Are there others out there like me? lol I used the Happy halloween seasonal kit for this layout and I love this kit! It's chalk full of Fancy Pants pretties!
I really started this layout with the arrangement of my pictures. I decided I wanted to print them out in a photo strip, then backed them with a thing white mat. I love dots, so I grabbed the orange dotted paper and cut a thick strip for the top of my layout and thinner one of the bottom of my layout. This gave me somewhere to base my photos and have a jumping off point.
I pulled bits and pieces of paper from my kit and started cutting strips of different sizes to add behind my photos. I really didn't measure anything, just cut them and slid them behind my pictures to see how it would work and I liked it so I kept them. I had also pulled out some of the ephemera, chose a few tabs and tags and slid them in there with the paper layers too.
I had more ephemera that I could embellish with, but I decided to fussy cut some of the little skulls out and then run some of the papers through my sizzix and make some layered flowers. I had fun playing with that lol. I had so many options for layering them. Once I got the flowers layered like I wanted, I moved on to placing them around my layout. I started with the left side of my photostrip andthen decided to add somemore up to the top right of my photo strip too.
I liked the way it was coming together, but I thought it still needed a little something at the bottom right, but I also wanted to make sure there was room for my journaling. So, I went through my papers and grabbed this cute huge cat, with the little kids riding on its back and decided to fussy cut it out and use it as an embellishment. I had more flowers left but when I was playing with them and the cat, it seemed like a little too much and went into the area that I wanted to use for journaling.
I went ahead and added my journaling that I had already printed out and called this layout done. I hope you liked this and I hope everyone had a great thanksgiving!

Tuesday, October 4, 2022

Sunshine Wanted Layout | Clique Kits

Good morning everyone!! I have a 12x12 layout to share using the Wildflower kit. One I love this kit! There are so many pretty papers and all the embellishments!! But for this layout I had to scrap a picture of one of my pups. It was a rainy day and he didn't want to go outside and he just moped around the house. He's so goofy.
He looks so mopey in this picture I kind of wanted to stick with more blues, but decided half way through that I wanted to add some of the yellow for some pops of color. This layout is really simple, but it was so fun to play with. I pulled a stamp, Flowers Always Add on, along with my watering can archival in and stamped on the upper part of my layout. Then I grabbed my Chartreuse stencil butter and watered it down and splattered it around on my layout, trying to keep it more towards the center of my layout so that it would show from behind where I was putting my layers.
I sat my background to the side to dry and started to play with the papers from the kits. I found a 3x4 pocket card that I decided to do my journaling on, so I knew that I wanted the first layer behind my photo to be larger but not to colorful. So I cut a large piece that fit both my picture and journaling card. I popped both of those up on foam adhesive and added them down. Made a mistake there. I hadn't added my stamping, but it worked out.
I pulled out a few of the other 3x4 cards and cut a label out of one to add in my layers, I didn't want to waist the rest of the card and thought the color of it worked great for adding to another layer, so I tucked it in at the top and off to the right side. It was all looking a little light at this point so I grabbed a large tag from the kit and cut it in half and added it to the right and left of my layers. I was liking the way it was looking so far but this was when I decided to add in some of those pops of yellow. I pulled a sheet of paper from the kit and fussy cut out a few strips of the scalloped strips and tucked them in at the bottom of my layers.
At this point I wanted to start adding more of my embellishments, so I dug in and pulled all sorts of pieces to tuck here and layer there. I found that yellow tab and added it onto my journaling card so that it would hide some of the writing that was on it that didn't really work for me, along with a piece if a tag from the kit as well to cover some more. At this point I added my journaling and then decided to pull a stamp from my stash and add a little rain cloud. I popped on my title and that was it for this layout. I hope you enjoyed this layout!!

Tuesday, August 9, 2022

Fur Baby | Clique kits Design team

Good morning, everyone! Summer is still in full swing here and we are spending a lot of time outside. When the kids are busy playing sometimes, I like to sit back in my hammock and read. Well, the day I scrapbooked about one of my dogs decided to be my shadow. He wouldn't leave my side lol, so I had to snap some pictures and scrap them.
I love this collection by the way lol. The kit I chose to work with was the good Stuff sampler kit.The colors are so bright and fun, one of the reasons I picked it! I started off matting my photos into a photo strip and then running the dark blue paper with criss-crosses on it, through my sizzix. I loved all the non-perfect circles and the fact that I could use this color and not make it seem to dark. My pup was looking off to the right so I thought I would put my photo strip to the left of the layout and move on with my layout from there.
​I went through the papers and pulled different ones I thought I might want to use and set those aside and pulled a few that I wanted to fussy cut a few things out of too. I pulled the rainbow striped paper out and decided to use it across the bottom of my layout, but I didn’t want that to be the only paper I used so I cut a strip of peachy pink paper too. I used a punch from my stash and ran it along one edge of that and slid it under the striped paper.
I went through and started pulling ephemera out and playing with where I wanted it on my layout, along with a few of the items I had fussy cut out earlier. I had thought I was going to use just the 3 labels I had cut out for my journaling and realized I had more I wanted to document, so I decided to make the patterned papers I added to my layout a pocket. This way I could hid a little more journaling n my layout and not make it overwhelming.
When I was done sticking all my stickers and labels and stuff down, I thought there was too much white space at the top. I saw that cute sun in the ephemera pack and thought it would work great on the top of my layout, so I cut out a few clouds by hand and laid them on my layout but thought I would take it a step further and run it through my sewing machine too. Lol. That finished this layout off.