Showing posts with label mixed media. Show all posts
Wednesday, November 29, 2023
Let it Snow Layout | Mercy Tiara Kit Club DT
Hey everyone!! How are you doing today? Were halfway through the week, woot, woot!!
Well, I thought I’d share a layout with you really quick that I made using the joy kit from Mercy Tiara kits club. This kit is beautiful and there are links below where you can go and grab it too.
I did a little different with this layout and pulled mostly blues, whites and a little bit of wood grain too. I had fun with a little bit of mixed media, a stencil and a bit of layering!
There is a full video up over on my Youtube channel if you’d like to see how this whole layout came together!
Thank you for coming by to check it out! I hope you come back to see what else I come up with!
You can find your Mercy Tiara Kits here
Monday, October 16, 2023
This is my Summer layout | DLS Design DT
Hey everyone! How are you doing this morning? It's actually getting cool here but I'm going to keep doing summer layouts! lol Do you scrap seasonally? Only summer in summer and winter in winter?
Well I wanted to share a layout I made for DLS design, I have a process video for it as well and will add that link towards the bottom.
I pulled out some of the stencils, sime of my distress oxides from my stash and went to town on the background. It still suprises me from time to time that it really doesn't take to much time to play with a little mixed media. I added a little water to the edges so that they wouldnt be clena and perfect, well i guess you'll see that in the video lol
But I had fun playing with the stamps ontop of the stencilling, and moved on to cutting and layering papers. Ok I'll stop talking now and you can just watch the video lol. Hope you enjoy!
Monday, March 21, 2022
Celebrate | Bramble Fox DT
Hi everyone!!! How's your monday going?? Well I am here today to share another layout with you using the Celebrate Perspextive, I also had some of the Hooray collection by Crate paper left over and thought they would be perfect paired together with this layout about my daughters birthday.
I went through the pieces I still had from Hooray and pulled everything I thought I might use, this way I knew what colors I was looking at. I wanted splatters or sprinkles as my daughter likes to call them, on her layout.
I stuck my pictures together with my tape runner, in a wonky photo strip. Then I started to tuck pieces of paper here and there, distressing the sides as I went.
I still had a few of the puffy stickers left and really they were too cute not to use so I popped the bear off to the left of the photos and the cute little cat over to the lower right. I slid a few tags in under the layers behind the photos so that my celebrate perspextive would have a good place to sit, nestled in next to the photos.
I knew that there was a little too much white space on the left side of the layout so I tucked bits and pieces over there too. Once I figured out where I wanted everything and before I stuck it all down, I grabbed a few of my distressed oxides and let my daughter help me make "sprinkles" as she calls them around the layout. Once those dired, I adhered everything down.
I love this Celebrate perspextive, for me, they work perfect as titles and then with the smaller bits they are perfect for embellishing pretty much anything! This one was another that as soon as I saw it, I knew exactly what picture it went with and that it would work perfectly! I added a few puffy stickers from the Hooray collection and a few enamel dots and that was it for this layout. I hope you enjoyed this layout and I hope you come back to see more of what I have fun making. Make sure to head over to the Bramble Fox site and check out all the new perspextives, stencils and dies. Everything is amazing! And check out the fox box too!
Monday, March 14, 2022
Smile | Bramble Fox
Good morning everyone!! I want to share another layout I made featuring a beautiful Perspextives from Bramble Fox. I love these Perspextives, they make it so easy to create a title or embellish your you/ project.
I started my layout with my picture and Perspextives. Thats what set the whole thing up for me. I saw this Perspextives and knew it went perfect for my picture of my little miss. I grabbed one of my past kits from Clique kits, pulled out some of the scrap papers i had and started layering them behind my photo.
I knew with the title/Perspextives being in blue, that I wanted some kind of blue here and there in my layout. I layered little bits of paper I had behind my photo and then grabbed a few tabs as well and added those.
After I got the photo layers the way I wanted them I moved on to the left of my layout. I knew I wanted everything else to be on the left since she was looking that way.
I actually caught this little miss looking out the window watching the squirrels play in the yard when I snapped this one. She was getting a kick out of them running about in the yard.
In the kit I was using I had that pretty vellum with rainbows on it and had to use it. I also pulled that big butterfly out of my stash and wanted to use it too.
I tucked bits and pieces here and there until I got it how I liked. I tied some thin twine around the Perspextives and had them hang from there onto the layout and I was happy and thought I was ready to adhere everything down but then I decided to do a little mixed media on the background. I grabbed my tattered rose distressed oxide and did some splatters. It matched some of the colors in my papers perfectly and then I was happy. I adhered everything down, typed my journaling up on my typewriter and placed that to the left of the dangling tags and was done.
I hope you enjoyed the layout I created! Make sure to go check out the Bramble Fox shop and go check out the new April fox box!!
Tuesday, February 1, 2022
Happiness is here Layout | Clique kits design team
Good morning everyone and Happy love month lol. I know, I'm a goof, but I thought I would kick off this month with a little love layout. I'm using the Forever Love sampler kit by Mimamolina | A.B. Studio. And I have to say I love this kit!
Sometimes I like to do mixed media but don't always have time or am to impatient lol. So, this worked out perfectly!
I went through the kit and found this beautiful paper with the mixed media looking heart on the background and thought it would be perfect. I pulled my sewing machine out and stitched a few times around the heart with white thread. Looking back black or gold thread would have worked great too. I left all the strings hanging out because I thought it added some texture to the page. I already knew what picture I was going to be using, so I went to pulling bits and pieces for my photo mat and embellishments.
I pulled from the ephemera in the pack and started layering the pieces under my picture, then I decided I wanted a bit more so I went to cutting up some of the ephemera pieces so I could add them in. There is a piece that looks like it has lace on it, So I decided to fussy cut that out so I could tuck it under the edge of my picture with all the other layers. I added a heart with some of that beautiful teal color and then pulled out the decoupage rice paper and ran it through my big shot and made a little doily out of it and added that to the layers too.
Once I did that I figured, hey I should run it threw my sewing machine too, so I did lol. Then I popped it all up n some dimensional adhesive and placed it down and went to working on the other clusters on my layout.
I cut out a larger doily from the rice decoupage paper and a few more hearts, layer them together and stitch them together and pop them on my layout and its done.
The paper already had splatters and everything soI didn't have to do that and I loved the way it looked.
I hope you enjoyed this layout and I hope you head over to the shop and check out all the kits and other pretties that are available.
Monday, January 17, 2022
Christmas Hair | Clique Kits
Good morning everyone! I know its after Christmas, but I'm still working on Christmas layouts lol. Are any of you doing the same?
Well this morning I'm sharing a layout of my youngest son and his hair cut for Christmas.
This boy usually like to keep his hair unruly and under a beanie, but for some reason he decided that he wanted to get his haircut before Christmas. And hey, if that's what he wanted, why not?
I started my layout with the Holiday magic seasonal kit, with all that beautiful Pinkfresh Studio papers and embellishments. I took the four smaller pictures of my son and mounted them on a piece of white cardstock, with a bit extra at the bottom. I popped that up on some 3D adhesive and stated layering a few of the papers behind that.
I pulled a few of the other papers and a few dies I had and ran them through my big shot so that I had some sprigs to tuck in here and there. I went ahead with tucking those in on the left and right of the photo mount, but at this point it was just looking to plain with just the white background. I pulled out some other papers and tried them, but I wasn't liking it so I went back to the white background and decided to pull out my stencils and go through them.
I found an old crafters workshop stencil with different size dots in a circle and decided to use it. I put it in the middle of my layout when I had had the photos sitting and grabbed my distress oxide in candied apple and went to buffin it thought the stencil. Once I had decided I liked how far it went out I stopped and placed my photos and my layers back on top and stuck it down.
I didn't really want to add much more to it, so I cut out one of the tags, added a puffy sticker and a few twigs and called it good. I did try a few other things, but none of them were right. So I left it a bit planer, but I like that the pictures are front and center in this layout.
Thanks for stopping by and checking out my layout! And make sure to head over to the Clique kits shop and look at all the pretties there are in the shop to play with!
Wednesday, December 15, 2021
Crisp Air layout | Clique kits International DT
Good morning everyone! I hope your weeks going good. I wanted to share a new layout I made using the Stitched together kit and the leaves turning add on kit. I know in a lot of places around its already winter, but it still looks like fall here and we actually got to have some fun and go on a hike. I loved this picture of my youngest son and had to scrap it.
I wanted to play with some cut files I had, so I cut out the leaves you see there. But I didn't want to back them with paper, so I decided to lightly trace the outside of the leaves on the layout where I wanted them and then use my distressed oxides, water them down a bit and splatter them where the leaves were going to go. Once that dried I added a little tape to the back and stuck them down. It worked out way better then I thought it was going to! lol
Once I got the leaves down I wanted a few papers behind my photo but I wanted to do something a little different for me, so I decided to go with circle mats. And I also decided to pop the up so there was a little more dimension. After I had my layout centered and knowing where else I had to put little things, I went to fussy cutting out some leaves and deciding what else I wanted to tuck here and there.
I cut out a few leaves and pulled a few from the ephemera pack and tucked them here and there around the circles, but I wanted a little more so I decided to cut a strip of paper and put a small piece on the top and bottom and then tuck a leaf there too. To finish off my layout I pulled some enamel dots from my a little scary kit, they went perfect with this! I placed some of those around my layout and I was done.
I love scrapping these pictures of my kids. Really I love scrapbooking them all, but after the last few years, its nice to have some fun and look at how my kids have grown.
I hope you enjoyed this layout and I hope you head over to the Clique kits shop and check out all the kits and all the other amazing items in the shop!
Tuesday, August 24, 2021
Experiment | Mixed Media tags | Clique Kits
Good morning everyone!! I am sharing some canvas tags with you today and some mixed media. Mixed media is something I've done in the past, not very much mind you and I barely ever share it when I do do it. I'm not quite sure of myself all the time when it comes to mixed media. But this month I wanted to try something new to me. So I pulled my Me Time kit along with some Heidi Swapp canvas tags and distressed oxides from the shop and went to playing.
I dug into my stash as well and pulled some great stamps from Coco&Reno and some Liquitex glass beads texture get. This texture gel I have had FOVEVER!! And have never used it, so I figured why not right? I'm trying new things so I might as well really go for it lol.
I jumped in with the glass bead gel, not sure if this was how I was supposed to do, but I did. I used a stencil and ran it through that. Once all my tags dried, I pulled out my distressed oxides, Clique Chromatics | Blooms Distress Oxide Set | Ranger, Clique Chromatics | Forest Distress Oxide Set | Ranger, and Clique Chromatics | Ocean Distress Oxide Set | Ranger. I smashed them on to a scrap piece of plastic packaging. After adding water to them I tried to smush the tags into my little puddles, but with the bead gel on there, there was a little too much dimension to work the way I wanted. So, I flipped them back over and went in with my water brush.
The water brush helped a lot. It allowed me to have more control with adding the amount of color I wanted to the tags. After I hit those with my heat gun, I used some of my label stamps and a background stamp with my stazOn ink, until I was happy with the way things were looking. Then it was in to my kit. I pulled paper and cut some tags out with my dies and layered them with labels from the kit. I added some other die cuts and then pulled the beautiful Alexandra Renken and Altenew dies and went to layering then till I got them the way I wanted.
I finished my tags off by stamping some sentiments and adding them to my tags.
I hope you enjoyed these tags. I have to say I really did like playing with them. And it allows me to try new things and be ok enough to be willing to try new things as well.
Monday, August 2, 2021
Get Happy | Clique Kits International
Hello everyone!! I hope your having a fantastic morning!! Last week was crazy for me, so I'm hoping that with this week, things might calm down a bit. And to start that for me, I decided to do a little scrapping!
I had the Sunkissed Sampler kit along with the Sunkissed Modern Documenter kit sitting here and with all these bright colors and fun pieces, I wanted to play with it so bad. So I pulled it out and started to play. I wanted this picture of my daughter playing on a slip-n-slide to be the center. So I started building from there. I took the strips from a few of the papers in the kit and cut them down so they would look like rainbow streams coming out from under the picture, ruffed up the edges to add texture to the page.
I backed my photo with some white tissue paper, a few of the cards from the documenter set and then popped it up on some 3d adhesive.
I pulled out all the pretties(AKA the ephemera packs and stickers) and started going threw them. I have to be honest, this took me way to much time, but I love to look and play with all the pieces. Anyways, once I decided what I wanted to do I started placing flowers on the paper that matched. I popped in a cloud, since I had went with a rainbow theme under my photo. I slid a tab to the top of my photo.
I felt like it needed a bit more so, I grabbed the pretty cloud paper from the kit and cut a strip of it too, ruffing up the edges like the other papers and popped a few ephemera pieces there too.
I kept looking at the layout, thinking it needs something else. So I went on the hunt. I pulled out my Amy Tangerine Brave and Bold watercolor set and decided to use a few of the blues to add some splattering and a little bit of a water touch to the layout, since my daughter was playing in a slip-n-slide in the photo. Once I finished that I finally taped everything down and my layout was done.
I hope you enjoyed this layout and I would love to see what you create with these kits too!! Make sure if you post them on Instagram to tag us so we can see your great work. And make sure to remember we also have a great facebook group that we'd love to have you as a part of.
Make sure to got check out the Clique Kits International shop for all the great kits and to see everything new thats coming it!!
Clique kits Products used:
Sunkissed | Sampler kit
Sunkissed | Modern Documenter
Amy Tangerine | Brave&Bold | Watercolor set
Friday, January 1, 2021
Merry Christmas | Clique Kits International
Good morning everyone and happy New years!! I hope you had a safe and fun New years last night!!
Well this morning I'm here to share a new layout with you that I made for Clique kits International
I pulled the stripped paper for my background, I keep trying to do something outside of my own little box latley. If not a color background then a patterned one. We will see how long this goes lol.
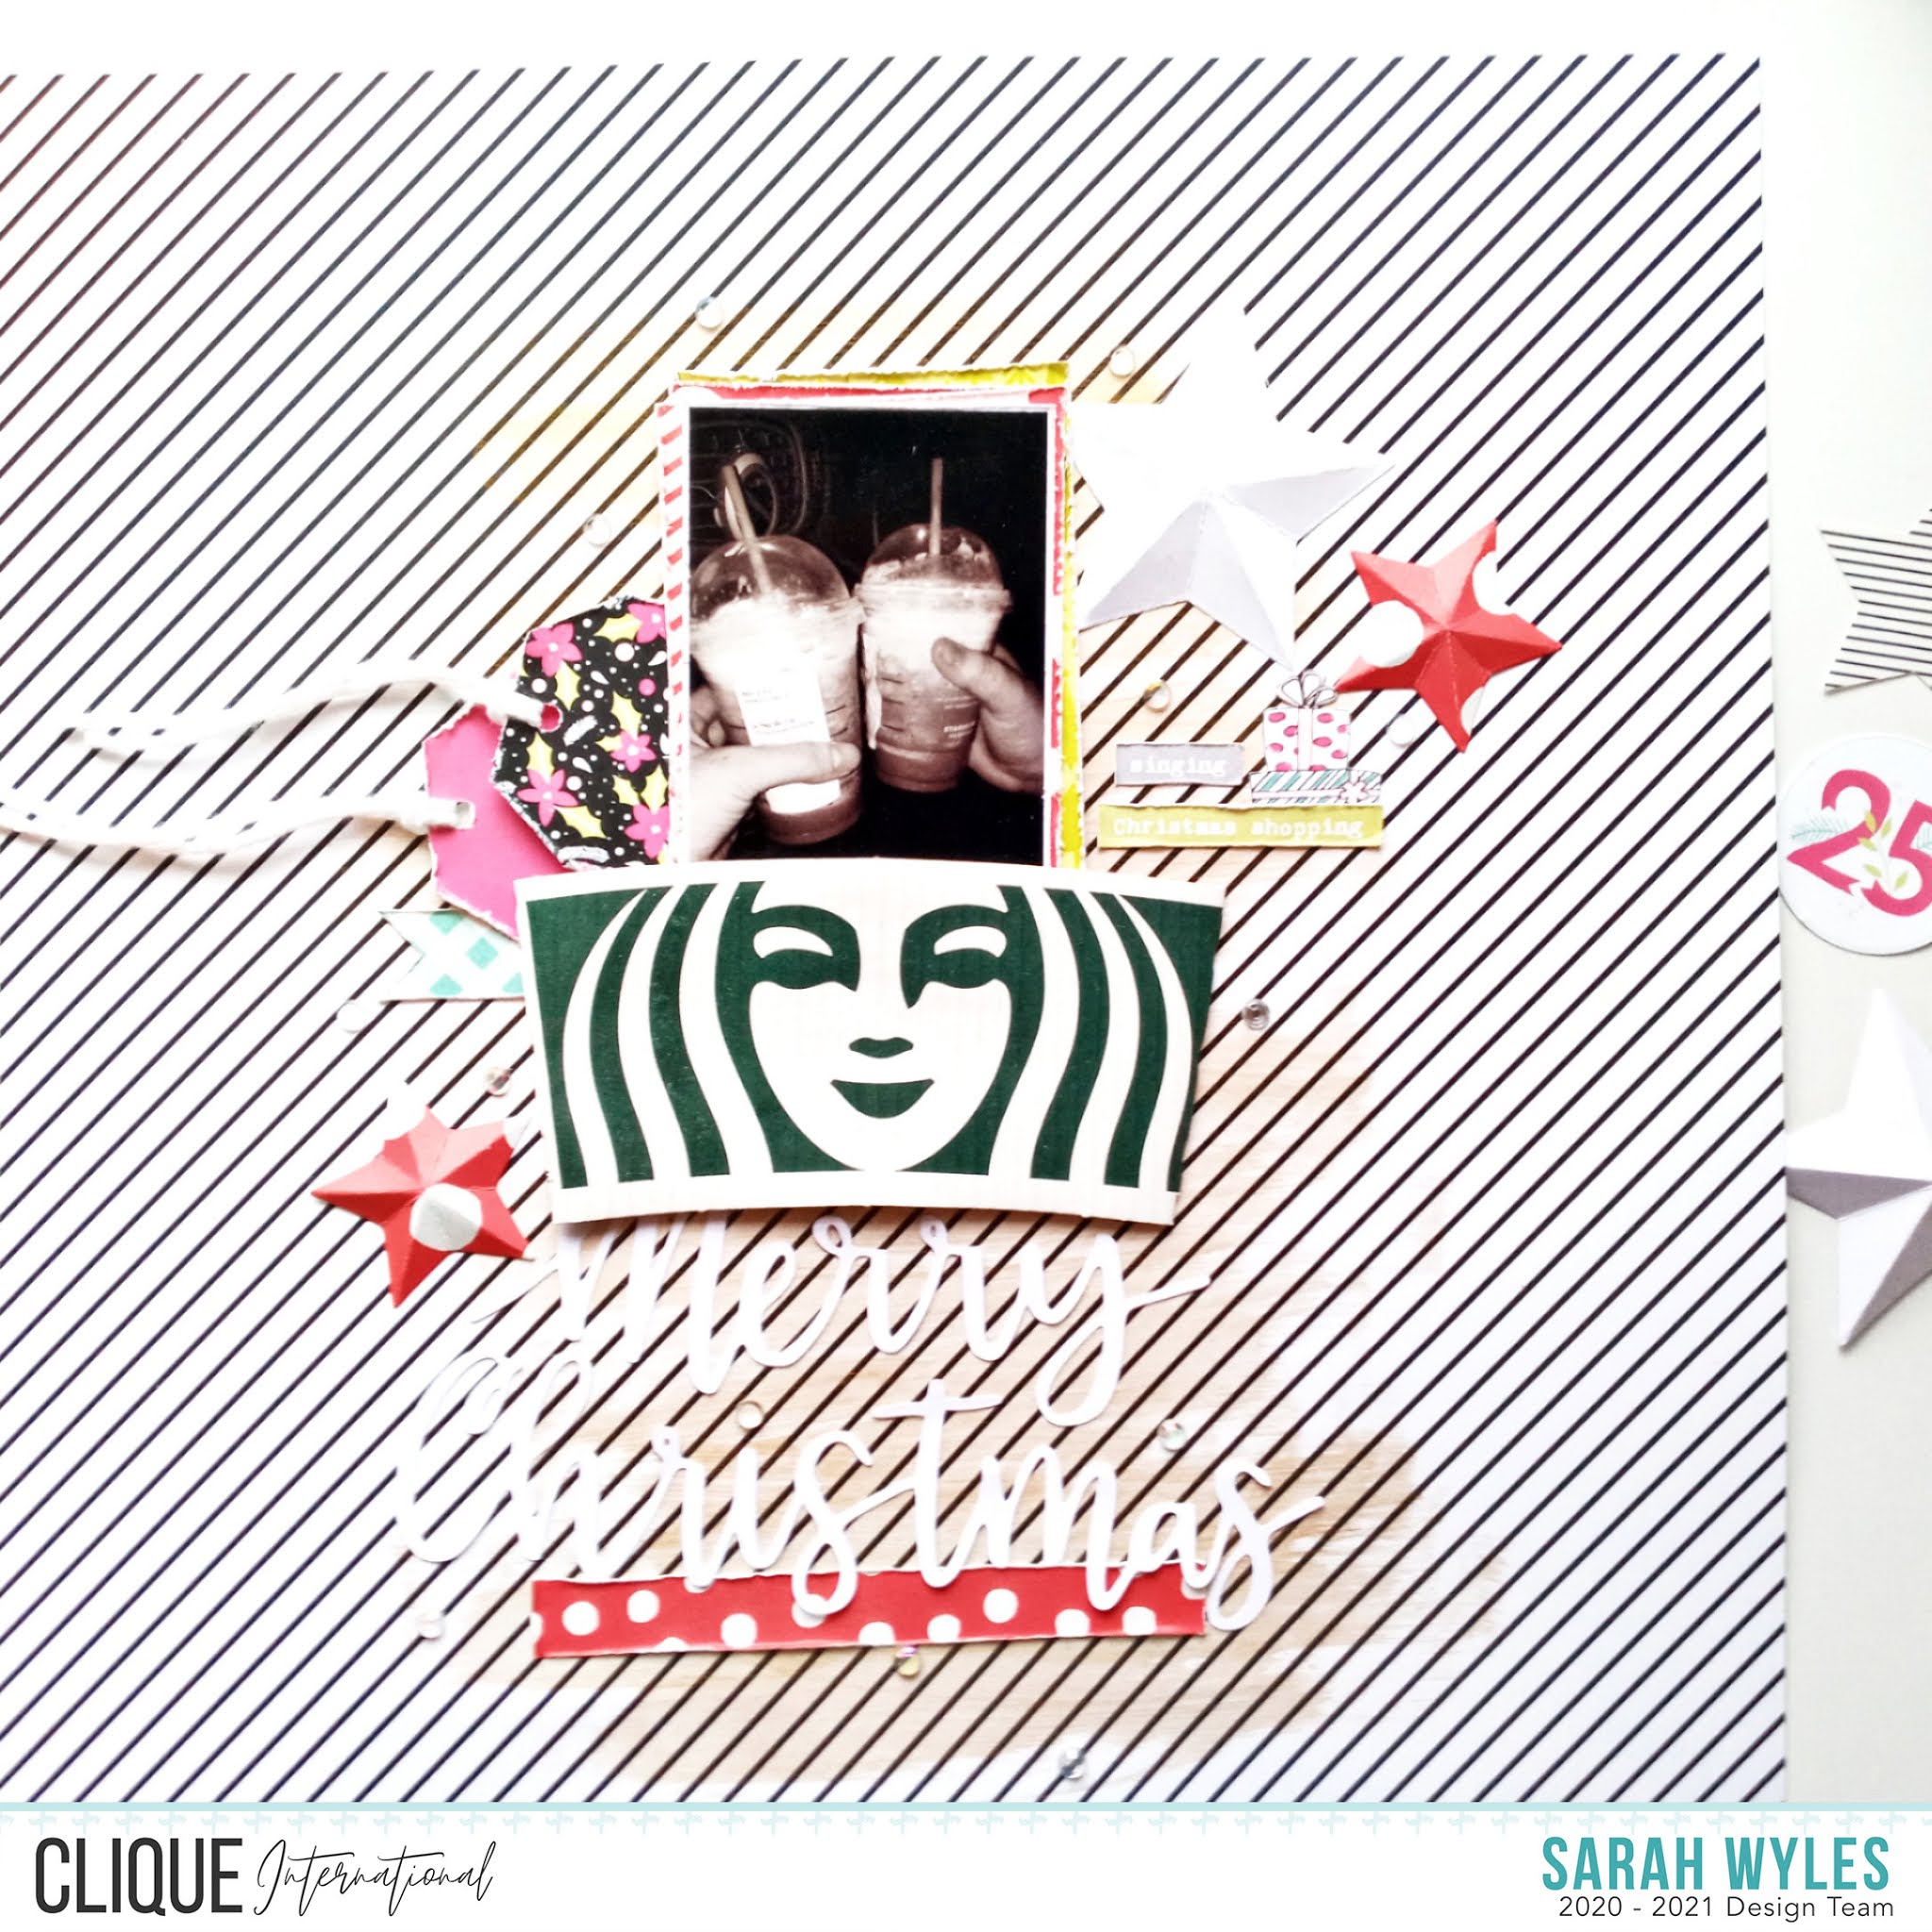
But I pulled it and grabbed my gold paint and dry brushed some of it down the center of my page, from the top to the bottom. When that was drying, I pulled a few papers form my Hey Santa paper pack and layered them behind my photo.
Once I had those layers done and the edges a little scruffed up, I grabbed the print outs I got off the Clique kits site. There in the store under digital. I didnt even know they had these, I knew there were cutfiles, but look what you find if you peek around! lol. But I liked this printable so I got it, cut it up and started to tuck bits and pieces of it behind my photo and its layers. I made sure to keep the little cozy thing they put on your cups at Star Bucks so that I could use it in the layout. I tuked my picture, its embellishments and such inside it and attached it all to the layout. This gave me my place for my title, so I added that cutfile to the bottome of the layout and then went to a little more embellishing. I used some more of the pieces from the printable, to the right side of my photo along with some stars I had cut out with the dies from the shop. Those things are great!! Once you cut them, you fold them and they have dyminsion! They are just too cute!. I popped a few more little rhinestones here and there on the layout and was done. This is a pretty simple layout, but it captured a moment of me and my oldest together. Even if his face isnt in the picture, we went and got our 1st Peppermint mocha of the Christmas season. He loves coffee just as much as I do,so it was nice to catch this little thing we do together and scrap it. When the Clique Kits site is back up after end of the year inventory make sure to head over and check out the shop!! There will be new kits coming and new supplies. There is always something beautiful to play with!! Clique Kits products used: Hey Santa paper pack Peintable | Into the Holiday's 2016
Subscribe to:
Posts (Atom)