Friday, December 31, 2021

December lits | Clique kits International design team

Hello everyone! I don't know about you, but I love to make lists. I make them all the time, everyday, but I make ones every month too. Sometimes they are just a reminder to pull out my camera and take some pictures, or something to push me a little further. Make me think outside the box. And I like this because sometimes it sends us on little adventures. December was a little different, we had a ton going on, family and health issues, so no real big adventures, but still Christmas fun, so I thought I would share my list and the way I decided to dress it up.
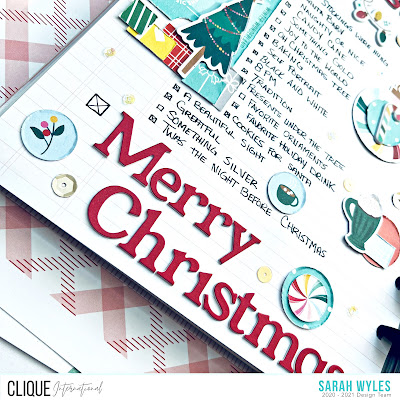
Usually I start out with my list and that's it, btu this past year I have been playing around a little more with how I do things. Why not dress it up and make it pretty? So I do that. I got the beautiful Holiday magic Seasonal kit and oh man was I looking forward to it! I love Pinkfresh Studio and this Christmas/Holiday collection was fantastic! I started by pulling some washi from my stash and running it across the top where I was going to put my title, then pulling the alphas from the kit and putting my title down. As you can see I started writing my list right down the left hand side of my page and then realized I didn't have to do that, I could lay a little with it if I wanted. So, I stopped what I was doing and started digging through the ephemer that came in the kit.
I pulled out everything I thought I would use, well really I pulled out everything lol. I started to layer pieces and play with how I wanted things laid out on my pages and started sticking them down. I distressed the edges and layered paper on paper, along with puffy stickers. And then I went back to writing my list. I'm not big on sharing my handwriting, not a fan of it or the mess ups I make but hey its part of it alot of the time right?
At this point this page was done and I could have left it at that but I wanted to still play with all the pretty thing and I had already taken some pictures of some of my decorations, so I decided to play on the next page too and add a little journaling.
So I moved to the next page, layed my pictures where I wanted them and started digging through my ephemera again. I wanted to have the washi on both pages, another something to bring them together so I pulled that back out and put it on the top and bottom of my page. Once I was done with that, I thought that the washi had made a great anchor for those cute little houses, so I distressed them too and stuck them down. I finished everything off by adding some of the gorgeous sequins that come in the kit and that was it. This really didn't take me long to make and I like how it turned out. I don't know about you, but sometimes I need to do something that is like a slate cleaner. Something that doesn't take much thought and you can just do freely. This, making my lists and decorating them, is one of those things for me. Is fun and relaxing and seems to rejuvenate me for scrapping when I'm having a block. Sometimes it's getting messy with mixed media that helps, other times its making my lists and making them pretty. What about you? What do you do when you have scrappy block?

Wednesday, December 15, 2021

Crisp Air layout | Clique kits International DT

Good morning everyone! I hope your weeks going good. I wanted to share a new layout I made using the Stitched together kit and the leaves turning add on kit. I know in a lot of places around its already winter, but it still looks like fall here and we actually got to have some fun and go on a hike. I loved this picture of my youngest son and had to scrap it.
I wanted to play with some cut files I had, so I cut out the leaves you see there. But I didn't want to back them with paper, so I decided to lightly trace the outside of the leaves on the layout where I wanted them and then use my distressed oxides, water them down a bit and splatter them where the leaves were going to go. Once that dried I added a little tape to the back and stuck them down. It worked out way better then I thought it was going to! lol
Once I got the leaves down I wanted a few papers behind my photo but I wanted to do something a little different for me, so I decided to go with circle mats. And I also decided to pop the up so there was a little more dimension. After I had my layout centered and knowing where else I had to put little things, I went to fussy cutting out some leaves and deciding what else I wanted to tuck here and there.
I cut out a few leaves and pulled a few from the ephemera pack and tucked them here and there around the circles, but I wanted a little more so I decided to cut a strip of paper and put a small piece on the top and bottom and then tuck a leaf there too. To finish off my layout I pulled some enamel dots from my a little scary kit, they went perfect with this! I placed some of those around my layout and I was done. I love scrapping these pictures of my kids. Really I love scrapbooking them all, but after the last few years, its nice to have some fun and look at how my kids have grown. I hope you enjoyed this layout and I hope you head over to the Clique kits shop and check out all the kits and all the other amazing items in the shop!

Monday, November 29, 2021

Hello Fall | Clique kits

Good morning everyone! I hope you had a great Thanksgiving and a good weekend to rest! I had a blast with my family. We even got to have some down time! This layout has caught some of our down time too lol. My youngest got stuffed and passed out in the couch in what we call a turkey coma lol. And of course I had to get some pictures and she just looks so content. I also loved the mood board this month and thought I would draw some inspiration from it as well. It all just looked so warm and cozy and the colors were beautiful. I didn't use everything but I definitely drew inspiration from it.So I am going to share the mood board below just in case you haven't seen it and hope that it inspires you too!
I started with the cut file first and foremost with this layout. I had found it in the Clique kits shop and knew I wanted to use it and I knew I wanted it to be big. While that was cutting out I had to decide on the colors for this layout and having the mood board helped with that.
Once I had chosen the papers I wanted to use, I knew there was going to be a lot of fussy cutting, and there was! But it was worth it to me! Once the cut file was done and before I backed it I pulled out my distressed oxide in speckled egg, smudged it on a piece of plastic and watered it down. Then painted the white cut file with it, then backed the cut file.
I knew I wasn't going to have a ton on this layout, so I decided to pop my cut file up so I could add some dimension and be able to slide the fussy cut flowers underneath here and there. At this point I hadn't stuck anything down, So, I moved to my photo and adding some layers behind that. I didn't want to add to many layers but I wanted to draw attention to it so I decided to add a few tags.
Once I had the layers done, I played with where I wanted everything sitting on my layout and after that was decided it was down to tucking those cute little flowers in here and there all over! I did decided to slid the picture of my daughter inder the edge of the hello fall cut file so that it was a continuous running line between the cut file and the photo. I really loved tucking all those pretty flowers behind the cut file and around the photo, these papers are just to beautiful! And I love the feel of comfiness and fall without being too fally. I hope you enjoyed this layout and I hope you get the chance to play with these kits. There are a lot of other papers in these kits, along with tons of fun embellishments that are more in the fall colors, but I decided to go a little different route with it. Make sure to go check out the shop and see all the new pretties that have come and make sure to check out the pre-order section too!

Wednesday, November 10, 2021

You are my sunshine | Clique Kits Design Team

Good morning everyone! I hope your having a good week so far. I'm already ready for the weekend here! I want to get some crafting done! But I wanted to share a layout with you today that I made with my Happy Blooms kit from the Clique kits shop. I love this kit!! The colors are amazing and all the pretty things that come in the kit!!
I have this love for yellow. I don't know what it is, maybe that it's such a bright and happy color, IDK. But I had found the little banner piece that said You are my sunshine and that kind of set the tone for my layout. I pulled one of the papers with that beautiful yellow and white and cut that at a diagonal for my background. I stuck that down to some white cardstock and started pulling papers and ephemera to layer behind my pictures of me and my goofy little girl.
I did run some white cardstock through my cuttlebug to add a little more texture to my layout. WHen I did this I really didn't know where I was going to put it but I wanted to have the option to use it if I wanted. Either way it would be used on something lol.I added a white border to my pictures and layered them the way I wanted and grabbed that beautiful blue paper with pretty flowers all over it and cut a square, then layered a piece of the packaging behind that, ruffing all the edges up as I went. That just wasn't where I wanted it though. I wanted more layers and some more color as well. Since I added that floral paper, I could use pretty much any color I wanted. I went through the tags and other ephemera and found this purple tag and added it in to the layers, then cutting my die cut in half I popped that in there too.
Once I did that I really started to like my layout, but I still wanted more on there. So it was time to break out the ephemera, puffy stickers and die cuts. I went through everything, pulled out way to much as I tend to do lol. Then I started to tuck a flower here, put a puffy sticker there and then I found the big teal floral puffy sticker frame and just had to use it. So I added it in under the tag layer and I love the color pop it gives!
Finishing off my layout pretty much came down to adding the pretty little banners here and there that said things about me and my daughter and doing a little journaling on the back of my layout. I hope you liked this layout, I did have fun making it. I'm trying my best not to hoard all the pretty things lol. I think I'm doing a pretty good job of using my pretties though. Make sure to head over to the shop and check out the new kits and hey if you like this kit, it's still available in the shop too! Along with so many others!!

Monday, October 25, 2021

Noteworthy | Clique Kits International DT

Good morning everyone!! I'm playing with my Happy Blooms kit today. I wanted to document one of my littles major haircut. And yes, for this one was major. I kinda didn't want to do it, but she wanted to so bad and it made her happy and didn't hurt anyone, so I figured why not, let her be her. So it happened lol.
I went to an app in my phone and made a photo strip and printed it out. I matted it on white cardstock and started pulling papers from my kit and playing with it. I love all the papers in this kit and it was so hard to decide, but I figured used a pretty floral print that had pretty much all the colors in it so I can use any of the other papers and it would look good lol. So I cut the floral paper down and grabbed the pink tone on tone plaid and punched a strip of that and slid it under the other paper and stuck it down.
There are so many embellishments in this kit too! So of course I grabbed those and stated going threw them, pulling all the little things I wanted to use. I had a huge pile, so everything didn't make it onto the layout lol. I started with that little pocket and placed it at the end of my pictures, this way I could stick a little hair in from her first haircut, Is that weird?
Then I decided to do a quick cutfile in white and pop it on my layout too. But I wanted more than just the white on white below my photos so I added another paper piece at the bottom of my photo and a light blue piece above it too. This made it really easy from me to slide in all the other little pieces.
I cut one of the frames from the ephemera pack diagonally and slid it behind part of the pocket on the left and then slid the other pieces on the opposite side to the pocket too. After that it was just playing with all the florals I had pulled out and tucking them in here and there till I was happy with it. I put one of the pretty butterflies up on the top too, and added a noteworthy tag to the bottom of the pocket that already had happy thoughts on it. and that finished this layout off for me. Thanks so much for checking out my post and make sure to come back and check out what all the other amazing design team members are up too as well. And always be checking out the Clique kits shop to see all the fun goodies that are there!!

Saturday, October 23, 2021

This must be the place | Clique kits

Good morning everyone!! I shared this layout on my instagram the other day and thought I'd pop on and share it here too.
This whole layout started with this little photo of one of my littles and here dog in the backseat of my car. We went on a ride one day and they both just fell asleep lol. So, I knew what photo I was using and then, this fabulous kit, the Some days kit, I had from Clique kits made the rest really easy. That cute little pocket was what set the tune for the whole layout. The colors were great. I went through the kit and pulled different items that went along with the colors in that pocket.
I pulled a stencil from a past kit from Clique kits and grabbed a distressed oxide, another goodie from Clique kits lol. Yeah, I have a lot of goodies from Clique kits. Well, I added that to the background, along with some splatters and then went to layering all the lovely bits and pieces till I got them where I was happy with them.
I loved all the journaling pieces there were in this kit, in the Pinkfresh loveliness! And yes, I did actually journal on them, but not till I finished the layout and took pics. I don’t like my hand writing, I share enough of my hand writing in my memory planning lol.
I made sure to pull out some of those cute floral ephemera pieces and puff stickers and tucked them in here and there. Then finished it off with a few enamel dots. I love those things, I use to hoard them but I’m always trying to find a way to put them in now lol. Well I hope you liked my layout and make sure to head over to the Clique kits website and check out all the beautiful kits and check out the blog at all the amazing inspiration!

Thursday, October 7, 2021

This is Halloween mini book | Clique kits International DT

Good morning everyone!! Are y'all excited about halloween and fall?? I have already started decorating and doing some fun things with the kiddos! Usually I just make 12x12 layouts for every month and never in order, and I still plan on making some layouts, but with things going on here I thought, well hey why not make a mini for the month and document everything like I do in December? So I did lol.
I started with an older Maya Roades album I had in my stash. Did a little white dry brush strokes, pulled out my TCW marigold stencil butter from my explore mixed media Halloween kit and started to play with this. After that dried, I grabbed some ink from my stash and grunged up the cover a bit. I pulled my alphas from my A little scary seasonal kit and put my title on the cover along with a few paper strips and a too cute ghost and some balloons.
I moved to the inside cover and decided to make a pocket so that I can stick extra stuff like movie lists for october and a good Halloween playlist for the month. But I still have room do I can stash some more things in there too. On my 1st page I had to use that little witch. She is just soo cute and I also wanted to document that this was Halloween 2021, so I made that pretty big. But I like the way it turned out. I ruffed up the edges and added a cut little spider too.
I mean, really! Isn't she so cute!
Next I moved on to my 1st real page about the 1st halloween movie we watched this month. I love Hocus Pocus and me and the kids like to sit down and watch it. Along with other movies we watch in October. I did a little paper layering on most of my inserts, I had to make sure to get some of that beautiful lace in there too. I made sure I had a journaling spot on my 2nd page so I could write about what we did. Like our 1st bonfire of the year!! The kids loved it! It had finally gotten cool enough outside to have a nice big bonfire and we stayed up late talking and playing. I can't wait for more of these!
I moved on to my last page for this week and added pictures of the bonfire we had. When we 1st started it and then when it was dying down at the end of the night, along with some fun little selfies with my girls that we took playing out there, cuddled up and having some good family time.
I wanted to use some cute 3x4 pocket cards I had as well, so I slipped some of them into pockets. Cut out some of my own tags from the pretty paper and aded embellishments here and there for some more pop. I had a blast with this kit so far and will be adding more to this mini album threw the month and you can keep up with it on my Instagram account and on Clique kits IG account too! ​Make sure to head over to the shop and check out all the new goodies that keep rolling in and get your hands on some great kits and get to craftin!

Wednesday, September 15, 2021

Let's Go! | Clique kits International

​Good morning everyone!! I am here today to share with you a little spread I did in my Maggie Holmes planner, that I'm using in a bit of a different way. I got this planner from the Clique kits shop and I have to say I love it! Along witht the beautiful Artist Remix kit chock full of Vicki Boutin loveliness! I will say there are parts of this spread that look a little blank, but I left that for a bit of journaling, that I added after I took my pictures.
I started by picking way to many photos, lol. Then changing the background color on the left side page so that I could layer on top of it with other pretties from the kit. I did a little stamping, I chose my postcard stamp for the fact that everyone else in these pics don't live close. This was a special time for our family. It had been 4 years since we had seen each other, so we picked a place and all met up there and spent 11 amazing days getting to know the little ones we had never met and getting to pick and play with everyone else.
Ok went a bit off topic there, lol. But I started layering bits and pieces here and there, behind the group picture of all of us. I added my title and moved on to the next page, where I added too many pics, but they all needed to make it. And to be honest, I actually cut back on the photos casue I have a TON more!
I created my own little photo strips and photo blocks. I really didn't have to add a ton to this spread. The few things that I did add, like that cute camera and title I chose for that page. I added a little layering and tabs behind my photos and that was it. Well that's all I pictures. There was a lot to record here and I know I went beyond the bit of space that was shown here. I had a blast and this is something my family tries to do at least every 4 years. There are a lot of us and not everyone got to come, but we try to make sure that we all get to see each other and have some fun. I hope you liked my spread for this week and I hope you head over to the shop and look at all the amazing new things that have come into the shop!!

Tuesday, August 24, 2021

Experiment | Mixed Media tags | Clique Kits

Good morning everyone!! I am sharing some canvas tags with you today and some mixed media. Mixed media is something I've done in the past, not very much mind you and I barely ever share it when I do do it. I'm not quite sure of myself all the time when it comes to mixed media. But this month I wanted to try something new to me. So I pulled my Me Time kit along with some Heidi Swapp canvas tags and distressed oxides from the shop and went to playing.
I dug into my stash as well and pulled some great stamps from Coco&Reno and some Liquitex glass beads texture get. This texture gel I have had FOVEVER!! And have never used it, so I figured why not right? I'm trying new things so I might as well really go for it lol.
​I jumped in with the glass bead gel, not sure if this was how I was supposed to do, but I did. I used a stencil and ran it through that. Once all my tags dried, I pulled out my distressed oxides, Clique Chromatics | Blooms Distress Oxide Set | Ranger, Clique Chromatics | Forest Distress Oxide Set | Ranger, and Clique Chromatics | Ocean Distress Oxide Set | Ranger. I smashed them on to a scrap piece of plastic packaging. After adding water to them I tried to smush the tags into my little puddles, but with the bead gel on there, there was a little too much dimension to work the way I wanted. So, I flipped them back over and went in with my water brush.
The water brush helped a lot. It allowed me to have more control with adding the amount of color I wanted to the tags. After I hit those with my heat gun, I used some of my label stamps and a background stamp with my stazOn ink, until I was happy with the way things were looking. Then it was in to my kit. I pulled paper and cut some tags out with my dies and layered them with labels from the kit. I added some other die cuts and then pulled the beautiful Alexandra Renken and Altenew dies and went to layering then till I got them the way I wanted.
I finished my tags off by stamping some sentiments and adding them to my tags. I hope you enjoyed these tags. I have to say I really did like playing with them. And it allows me to try new things and be ok enough to be willing to try new things as well.

Monday, August 2, 2021

Get Happy | Clique Kits International

Hello everyone!! I hope your having a fantastic morning!! Last week was crazy for me, so I'm hoping that with this week, things might calm down a bit. And to start that for me, I decided to do a little scrapping!
I had the Sunkissed Sampler kit along with the Sunkissed Modern Documenter kit sitting here and with all these bright colors and fun pieces, I wanted to play with it so bad. So I pulled it out and started to play. I wanted this picture of my daughter playing on a slip-n-slide to be the center. So I started building from there. I took the strips from a few of the papers in the kit and cut them down so they would look like rainbow streams coming out from under the picture, ruffed up the edges to add texture to the page.
I backed my photo with some white tissue paper, a few of the cards from the documenter set and then popped it up on some 3d adhesive.
I pulled out all the pretties(AKA the ephemera packs and stickers) and started going threw them. I have to be honest, this took me way to much time, but I love to look and play with all the pieces. Anyways, once I decided what I wanted to do I started placing flowers on the paper that matched. I popped in a cloud, since I had went with a rainbow theme under my photo. I slid a tab to the top of my photo. I felt like it needed a bit more so, I grabbed the pretty cloud paper from the kit and cut a strip of it too, ruffing up the edges like the other papers and popped a few ephemera pieces there too.
I kept looking at the layout, thinking it needs something else. So I went on the hunt. I pulled out my Amy Tangerine Brave and Bold watercolor set and decided to use a few of the blues to add some splattering and a little bit of a water touch to the layout, since my daughter was playing in a slip-n-slide in the photo. Once I finished that I finally taped everything down and my layout was done. I hope you enjoyed this layout and I would love to see what you create with these kits too!! Make sure if you post them on Instagram to tag us so we can see your great work. And make sure to remember we also have a great facebook group that we'd love to have you as a part of. Make sure to got check out the Clique Kits International shop for all the great kits and to see everything new thats coming it!! Clique kits Products used: Sunkissed | Sampler kit Sunkissed | Modern Documenter Amy Tangerine | Brave&Bold | Watercolor set