Showing posts with label pretty little studio dt. Show all posts

Thursday, January 24, 2019

Hello Captured Kisses-Pretty Little Studio DT

Hello Again!! Sarah here this morning playing with the Savannah Dreams Collection and playing with a fun picture of me on my youngest!
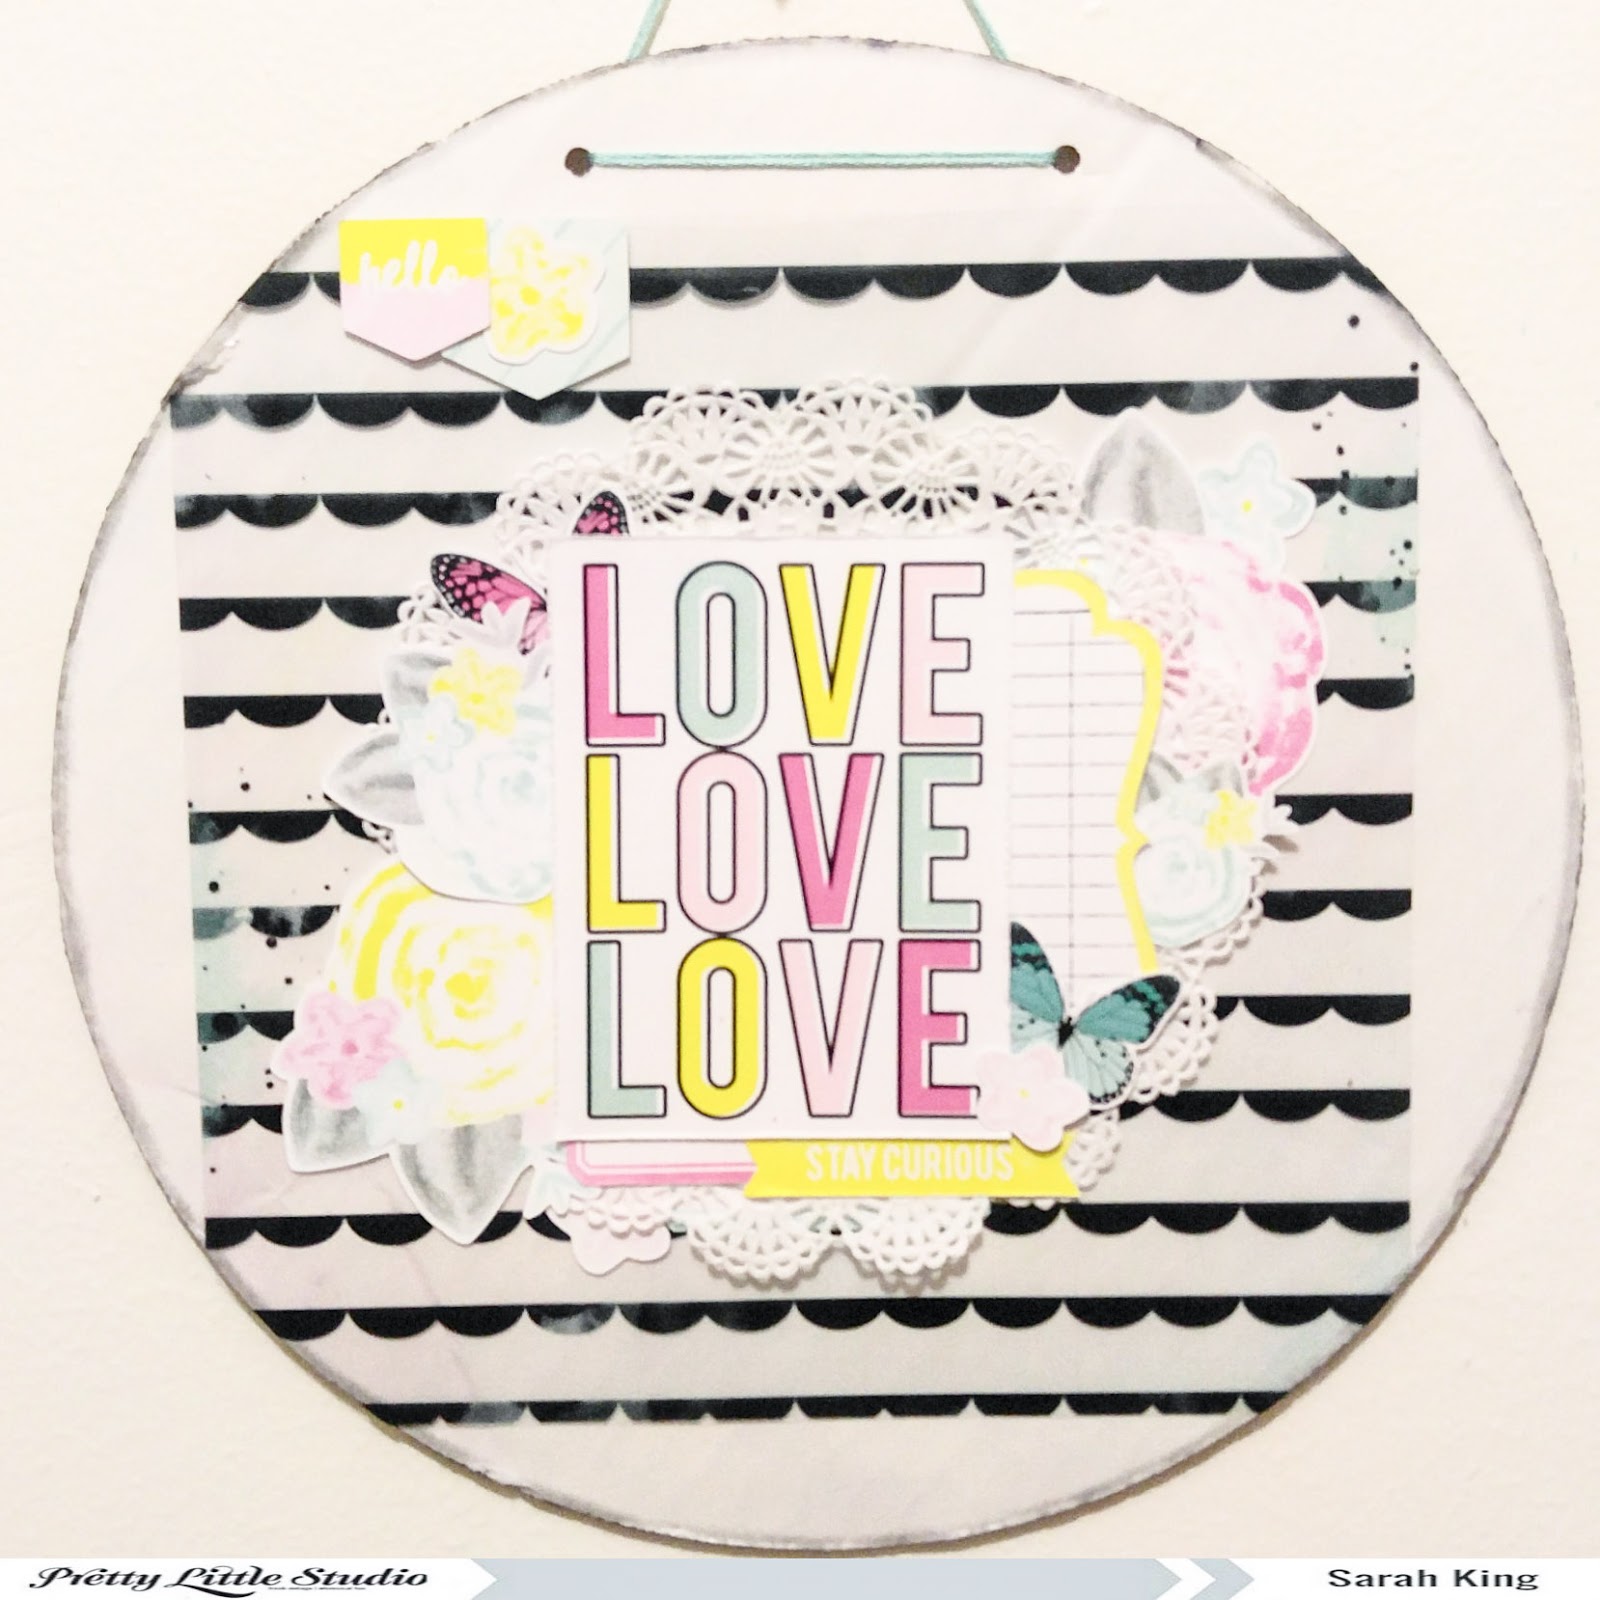
I started out with a sheet of white cardstock, I cut a few strips from its a new day and added it to the tops and bottom of the layout, I added it under the white cardstock, cut a little of it off and then ruffed up the edges. I'm really liking the distressed edges lately! I love the Happy Life paper, it looks a little distressed and has splatters already on the paper. So I grabbed that paper and added it to the top of the layout and ruffed it up a little too.
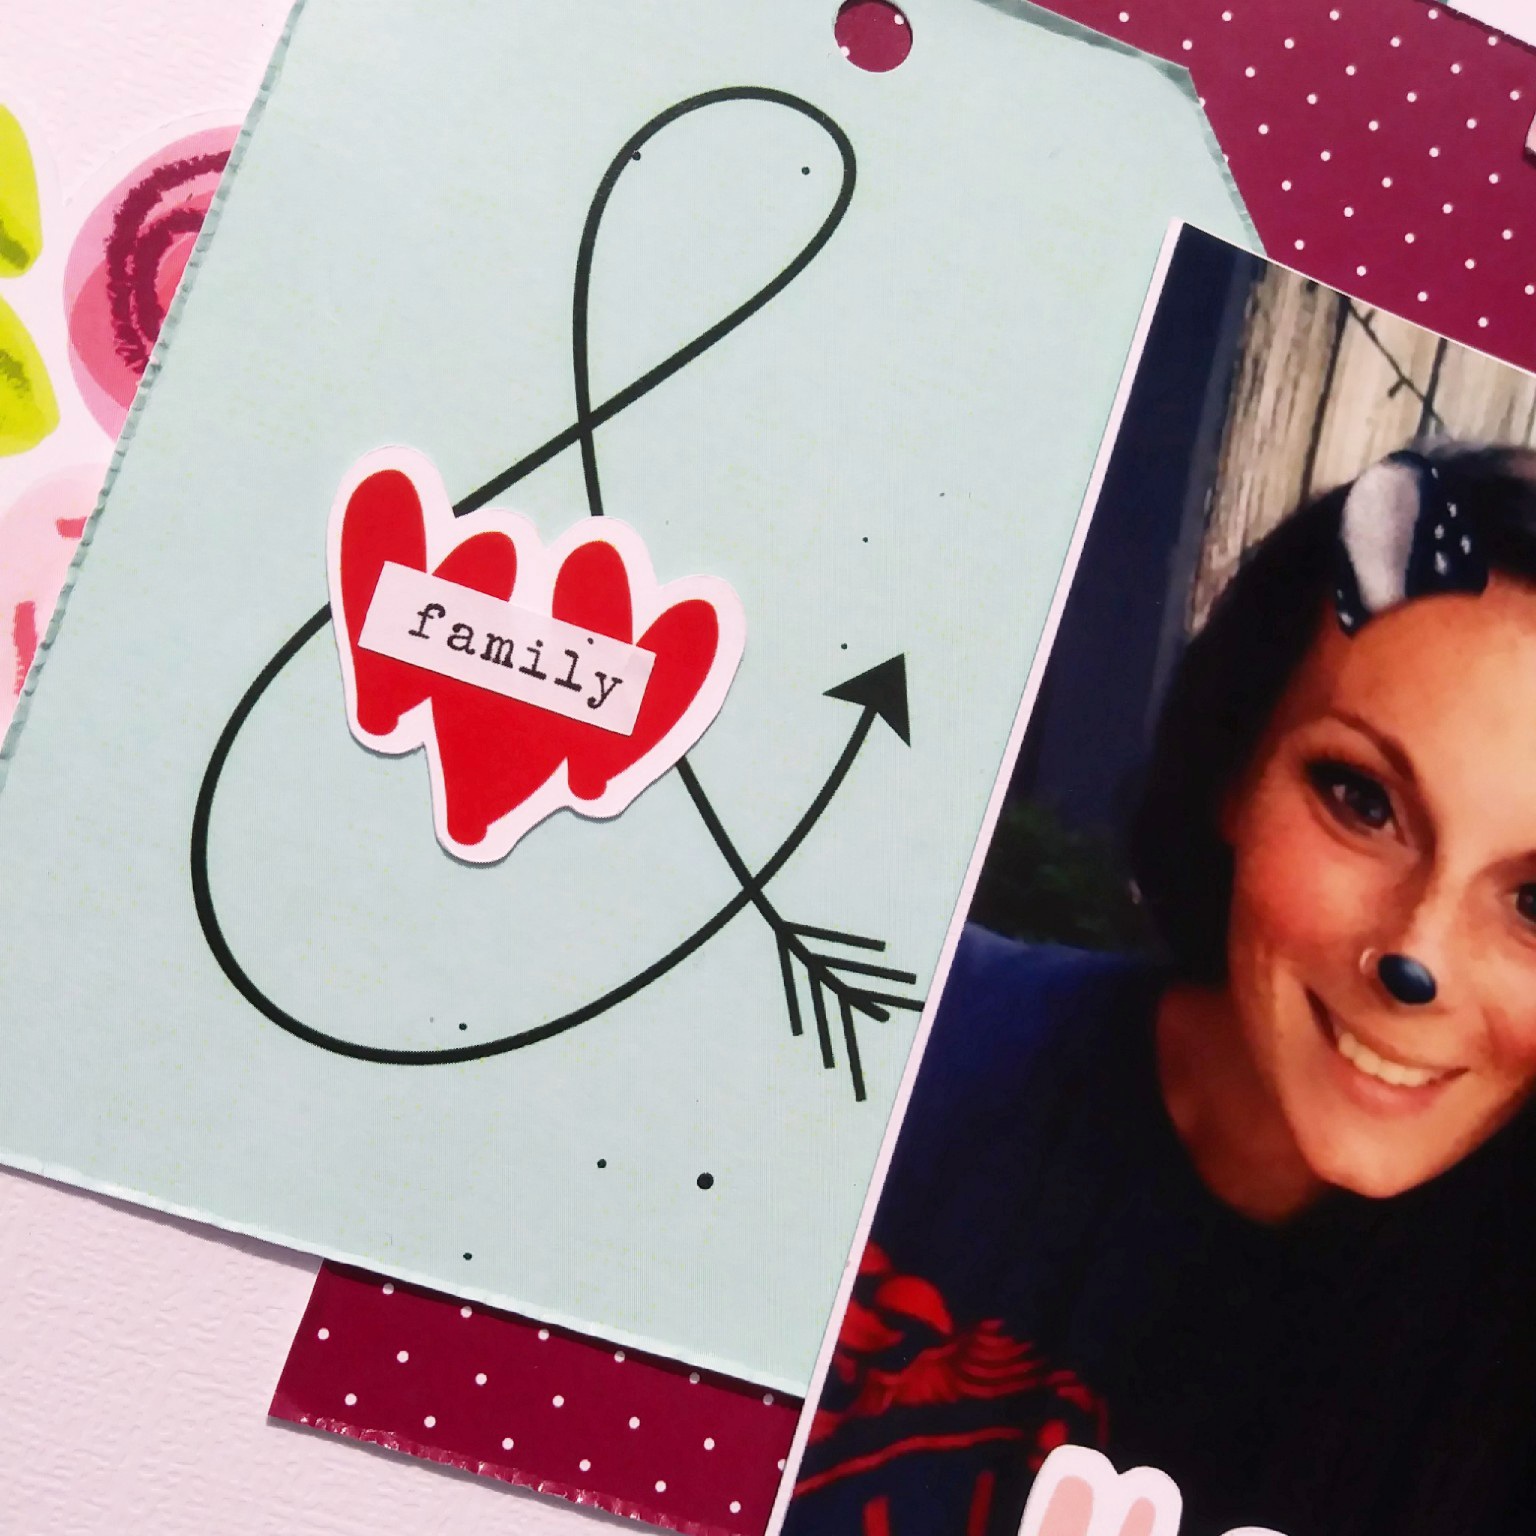
I moved on to adding a few layers behind my photo, then moved on to the left of my photo, where I was going to put my title. So I did some layers, mimicking the ones behind my photo. I knew what I wanted my title to be, so I pulled out the die cut word I wanted to use, along with the clear sticker and some alphas from my stash. Once I had the title where I wanted it I added a strip of vellum washi, a label and a die cut floral, then added my title on top.
I placed my photo and title down where I wanted them, then started tucking my labels, die cuts and popping up some of the cute little butterflies on some 3d foam. To finish everything I added some of the A Birdy told me stickers.


Pretty Little Studio Products: 

Sunday, January 20, 2019

Its a beautiful day / Pretty Little Studio DT

Good Morning everyone! Its been a while but I'm back and ready for my newest post for Pretty Little Studios and using there new collection, Savannah Dreams 
I do have to say that I love this collection, not only are there 12x12 papers but the colors!! Beautiful! I do have to say I'm looking forward to Bohemian Dreams too!! Make sure to head over to the site and check it out and pre-order it!! You wont be disappointed!!
Anyways, back to my layout lol.
I chose a picture of  two of my goofy girls on the trampoline this past summer, just having fun. I fell in love with the Inner Artist paper when I saw this collection, so I pulled it, knowing that I wanted it to be a larger feature on my layout. I started by cutting one six inch strip and putting it on the right hand side of my layout, but I wanted a little more of it and a place to tuck things under, so I cut another strip and layered it on top of the piece I had already taped down, then I distressed the edges a little and moved on to layering behind my picture.
I put a few layers behind the photo, pulled out the Label it die cuts and started to tuck them in, coming out from the left hand side of the photo. I have a huge love for the 6in doilies on the PLS site, so I added one to mat my photo and all its layers, plus its just so pretty!! lol
At this point, to me it was obvious that it was time to add some flowers and my title. So I pulled the die cut packs and started sorting threw all the pretties and set aside all the ones I wanted to use, this can become a problem with me though, lol, because I will end up wanting to try and get them all on one layout! lol But there so pretty so really is it a problem?lol
I added florals, tucked little messy thread nests here and there and then added a little floral embellishment cluster to the left hand side of the layout. I chose to do this because I had managed to put pretty much everything towards the right side of my layout. Adding the cluster to the left made it balance out a little for me.

Thanks for stopping by and checking out my layout and make sure to head over to the Pretty Little Studio shop and check out all the pretties there are to buy!!

 
Pretty Little Studio Products used:
Savannah Dreams Collection: Savannah Dreams 12x12 paper pack; Inner Artist, Once in a lifetime, Just let go, Its a new day, Exclusive 12x12 paper pack die cuts, Label it die cuts, Savannah Label cut aparts, Floral Fantasy die cuts, Happy mix washi vellum stickers, 6in Cambridge doilies


Saturday, February 24, 2018

Right here/Pretty Little Studio DT

Good morning everyone!!
Sarah here this morning to share a new layout with you using the XOXO Collection. I have to say that I really do love this collection! The colors are beautiful and all the pretty patterns! So many pretty bits and pieces, you can layer so much and I did a little layering of pieces in this layout.
I started out by picking out my picture and then pulling one of my favorite 8x8 patterned papers from the paper pack and adhered it to the bottom center of the page. I added a small blue photo mat around my photo and then place it at the top middle of the 8x8 paper that I had already placed down.
I liked my photo where I placed it, so I grabbed a few die-cut labels and bits and added them to the left side of my photo, tucking them under, behind and on top of it.
After I got that little bit of layering done, I jumped down to the bottom of the layout and pulled out a bunch of the die-cut circles and labels and started to lay them in a grid like design. Once I got them where I wanted them, I adhered them down and pulled out my flair buttons from the collection and picked three, and oh man was that hard cause I wanted to use them all!! lol.
Once I chose the three I was going to use, I pulled some black thread from my stash and made some little messy thread nests to go behind the flair buttons and glued them down. I went back and ruffled up the edges of the circles and papers behind my photo to add a little more dimension to my layout and then splattered a little bit of my shimmerz at the top to finish it off.
Thanks so much for checking out my layout and make sure to head to the shop and check out all the pretty new things coming in!

Pretty Little Studio Products used:


Monday, February 19, 2018

You&Me / Pretty Little Studio DT

Hi everyone!! Im back today to share a new layout I made for the Pretty little Studio design team using the new and beautiful XOXO collection!

I loved the colors in this collection, purple is one of my favorite colors and I was so happy to see more of it showing up in scrappy collections this release! The teals and pinks are a great combo with the purple too!
I dont usually use color photos, but I thought it worked well enough with this collection, so I went for it! I started out with a larger purple rectangle in the center of my layout. I'm a sucker for polka-dots too, so I grabbed the tri colored dot paper and added a strip of it, off set and towards the bottom of the purple paper. Then I decided to see where exactly I wanted my photo.


Once I decided where I wanted my photo and backed it with some white cardstock, I started to add embellishments around my layout. I love the pack of blooms, and tucked them in here and there around my layout, along with some labels.


I was liking my layout, but I felt like it was off balance with the off set dot paper to the right, I thought I needed to add something to the left side too. So I pulled out one of the journaling cards from the collection and cut it into a tag shape and punched a hole in it. Then I grabbed those cute little hears and added them on top of the ampersand. 


I added a few more labels, tabs and blooms to the left of my photo. I added my title to the bottom of my photo and finished my layout off with a little shimmerz from my stash.


Pretty little studio Products used:

Friday, January 5, 2018

Thankful for this crazy kid-12x12 layout Pretty Little Studio DT

Good morning everyone!! Sarah here this morning to share with you a 12x12 layout I made using Feels like fall, but instead of using it for a fall layout, I used it for an everyday layout.

I had fun with this layout! I love the colors in this collection, so instead of making a fall themed layout I thought that the colors could go for an everyday layout too. I know the leaves make it a bit more fallish but the leaves are so cute I just had to use them! I started this layout by actually cutting those strips and laying them in the middle of my layout. I never start like this, no idea what I really want to do, I usually have an idea in my head, but I just decided to play.
In my picture, my son is looking pretty much straight on, but I didnt want my picture to be right in the center of my layout, so I sat him over to the right side of the layout and started building there.


I cut some strips in different sizes in the same patterns that I used to back my photo and layered them on top of  each other and then tucked a few leafs in and then added a few of the clear stickers from the Potpourri collection 
At that point I realized out one sided my layout was, but realized I hadnt decided where to add my title in. So I took some packaging from one of my Feels like fall die cut packs, trimmed it down and pulled out some alphas from Pretty little studios and some from my stash and created my title. I tucked some more leafs in, took a look at my layout and thought I might want to add a little something up at the top to the left side.


I went up to the upper left side of my layout and added some strips, like I had done under my photo, sort of mimicking it. I liked the way that looked but I decided to trim my layout down on the right and bottom sides and add a navy boarder, and that finished my layout for me. I hope you enjoyed this layout and I hope you head over to the shop and check out the new collections to come and the rest of the collections too!!
Pretty Little Studio products used:
Wonder Collection, Yellow alpha


Sunday, November 26, 2017

Hello Daydreamer-Pretty Little Studio DT

Good morning everyone!! 
Im Here to share another layout with you and this time I'm using the With All my Heart collection.
I started my layout with a picture in mind, the one shown above. It was my youngest daughters birthday, we had a little party for her and she had a blast. We ate cake and did presents and after that we turned the sprinkler on and played in it.
I had picked the collection to use and decided I wanted to use circles as my focus on this layout. I I went to punching them out.

I chose a paper for my background and covered it with a sheet of vellum, to soften it up. I chose where I wanted my photo and went to laying out where I wanted the little circles in all the pretty colors and patterns.
Then I went on to deciding what was going to go behind my photo. I knew I wanted to use a doily, so I added that right off the bat. Then went in and grabbed my floral die-cuts, some labels and a tag and started layering.

Finishing off my layout, I grabbed a die cut word and added some of my silver glitter thickers and added my title to the bottom left of my layout. I tucked in a few heart die-cuts and a few more circles here and there and was done.

Pretty Little Studio Products used:

Tuesday, November 21, 2017

Pinsperation-Hay Bear-Pretty Little Studio DT

Good morning everyone! 
Sarah here this morning to share another layout I made using some pretty products from Pretty Little Studios and along with a little pinterest inspiration! 
I chose to use colors on the lighter and brighter side, with a little black thrown in on my layout. I used the Potpourri collection for this layout, I loved the colors in the collection, they went great for a fall layout and thats what I was doing.
I had ordered the swatch pack and wanted to use them on this layout, so I pulled them out, chose the ones I wanted to use and started laying them out on my cardstock. I set it up in a pyramid shape with my photo at the top.


I grabbed the beautiful vellum paper, Pile of leaves out and did a little cutting, well I cut all the pretty leaves out and tucked them behind my photo instead of adding a bunch of layers. I tucked them behind some of the swatches at the bottom of the layout too. I liked the little bit of dimension that it added to the layout, I also decided to ruff up the edges of my swatches. 

To finish my layout I grabbed the Thankful clear word stickers and tucked some of the black leaves around the layout too. I added my title to the bottom with some thickers from my stash and did a little play on words. Then I grabbed some shimmerz and added some little dots around the cluster of leaves. And that finished it all off for me.


Pretty Little Studio Products used:

Friday, November 10, 2017

Extraordinary-Pretty little Studio DT

Good morning everyone!! I hope your week went good and that your looking forward to a good weekend too!
Well this morning I'm sharing a easy layout that I made using the Tales&Dreams collection again. Like I said on my last layout, I love the floral die cuts in this collection and I played with those again on this layout, along with some frames for layering.

I started this layout with a piece of white cardstock and a pencil. I drew a circle on the page lightly. I already knew what picture I was going to use. My daughter sitting at the park on some steps just cheesin it up, lol. But she was just to cute not to use this picture.
I pulled out my die cut packs and started to lay the flowers around the circle. Once I got them all laid where I wanted them, with the little leafs tucked in here and there,I ran them threw my sewing machine a few times. After I finished sewing them down, I grabbed my scissors and cut under all the flowers, right by the thread. I left the inside attached so I could build my mat for my photo.


 I added foam to the back of the flower wreath and pulled a stripped paper from my stash to mat it all on. Once I had that down I pulled out my frames and started roating the behind my photo. I knew I didn't want  a lot behind my photo, so I was happy with the little bit of color popping on all the sides. I added a tab to the top, along with a little word sticker, then pulled out the die cut words and pulled out extraordinary and places it across the empty spade to the right on my photo. 


That was it for me for this layout. I wanted to add a little journaling about that day and about her, but I didn't want to have it on the front of the layout. I didn't want anything to take from the picture or the pretty flowers, so I decided to journal on the back. Its still there, it can be looked back on and read but isn't visible to everyone. I hope you liked this simple layout and I hope you go check out the new collections in the shop!! And there are always more to come!!

Pretty Little Studio products used:

Saturday, November 4, 2017

Dare to dream../Pretty Little Studio DT

Good morning everyone!! I'm here this morning to share a new layout made with the Tales & Dreams collection and oh man is this collection beautiful!! 


With this layout, I chose to focus on the floral ephemera packs. I mean look at those flowers!! Who could not want to play with those!! I wanted to play with a diagonal on this layout. So I started by lightly drawing 2 diagonal lines across the page that I knew would fit my picture in. I didn't even mat my photos, and I always mat my photos! 
After I drew my lines on I added some Shimmerz in between them, let them dry and started playing with the pretties.

I started laying out my flowers on the lines I had drawn, They looked beautiful, but I wanted to add a little something else in , so I grabbed my label pack and slid them in over a few of the flowers. When I got those where I wanted them, I ran my sewing machine across them a few times, with black thread.
I added my photo in to the top right of the diagonal, I tucked a tag behind one side of the photo and a tab on the other side. I just wanted a little color added behind the photo and a little layering. I pulled out a word die cut pack and made my title.

I remembered I had the clear leaf stickers so I thought it would be a nice touch tucked in here and there and bring in some more of the black from the thread and the photo.
I splattered a little more shimmers and that was it for this layout! Thanks so much for stopping by to check out my layout and make sure to head to the store and look at the new collections!!
Pretty Little Studio products used:


Tuesday, October 24, 2017

Fall Riddin-Pretty little Studio DT -Pinsperation

Good morning everyone!! I hope you had a good weekend and a great start to your fall!
It has finally started to cool off here in the south and it is so nice!! It is time for bon fires, sweaters and boots!! So on that note, I wanted to share with you a layout I made of some picture from about two falls ago. We were up in the mountains four wheeling and driving the kiddos around in the mule. We had a blast!
I used this picture for inspiration for this layout:


I thought that I would go with fall colors and circles since the picture is full of pumpkins,lol. I pulled out multiple papers and punched different sized circles out. I knew I wanted more color on the background without adding a lot of paper besides the circles. So I pulled out some of my shimmerz and added a bit of color to the background, sat it aside to dry and pulled out come papers and started popping out some circles.

I had 2 photos from fall a few years back, we loaded the littles up in the mule and drove them around while some of the adults road the four wheelers. It was nice and cool outside and a good day for a long ride. So after popping out a bunch of circles, I laid my photos out where I wanted them and started placing the circles down.


After I got the 1st set of circles laid down, I went back threw and added some of the circle stickers in over lapping some of them. When I was done adhering the circles down I went back in and drew around then.  

I added my title to the left of my photos, then went back in and added a few clear epoxy stickers over some of my circles to add a little dimension. I liked my layout at this point but thought it was missing something. So I decided to cut a few paper strips and add them to the left and right of the layout and that finished it for me!
I hope you liked this layout and make sure to check out the shop for the pretty new collections! Christmas is coming soon and there are already Christmas goodies in the shop, so if you are planning your December Daily out, its a great time to start shopping!!

Pretty Little Studio Products used:


Sunday, September 10, 2017

She Glows/ Pretty Little Studio DT

Good morning everyone!! Im here this morning to share with you a layout I made thats a mix of two collection from Pretty Little Studios with a bit of mixed media added in!

This layout is of a friend of mine ate her baby shower and she just looked amazing and like she was glowing, witch is where I got the title,lol.
 

I started this layout by pulling out some of my Shimmerz products, playing with some of the dazzlerz on the background to add some texture and when that dried I pulled out a few sprays and played with the packaging technique, while that was drying I started playing with some layering behind my photos.

I pulled out some of the journaling cards from With all my Heart and Blooming Hearts and started the layering process. I backed my pictures with a small white boarder and then added Romantic Lace from Blooming Hearts. I added some packaging behind the jounaling cards and a pretty lacy doily. I tucked a few tabs, lables and flowers around the photos. 

Then I moved to the left side of the page and pulled out a die cut word from Ashley Hortons line, Aint life grand and wanted to use it, I mean shes pregnant and fixing to have her amazing little girl, so I thought it went well! lol I used the heart vellum tape with a few flowers from With all my heart and a few from Blooming Hearts and it went well together.

To finish off my layout I wanted a little more black and white, so I dipped into my stash and cut two strips of black and white stripped paper and added that to the top and bottom of my layout and added she glows to the top of the photo cluster and was done.

I hope you enjoyed this layout, with the mix and match of the collections!

Friday, September 8, 2017

Out & About/ Pretty Little Studio Dt

Good morning everyone!  Sarah here this morning to share with you a new layout I made with the "Wish you were here" collection. 


I've had fun playing with this collection! I did decide to do another boy layout with this collection but I just couldn't help it, the colors are just fantastic!


This is a picture  that has been sitting in my pile for years, seeing how my son is fixing to become a teenager,lol, this was YEARS ago! There's nothing huge about this picture, other then I think he was to cute and I managed to catch it. 


 I decided to play with and 8.5x11 for the 1st time in forever and I had fun with that too. I started by matting my photo and adding a few paper layers behind it with some frames and such. Then I moved to the paper straps on my background.


I added some tags and labels at the top with a word sticker. Then moved back down to the paper straps behind the photo and added a star die cut in where I had used a circle punch. Then to the bottom of the photo I added some lables and the die cut title. To finish off my layout I cut a strip off the left side and added a strip of charcoal card stock and then finished everything off with some black watercolor splatters and that was it!

Thanks so much for checking out my layout this week and make sure to get your hands on this collection and ND watch for what's coming out next!

Pretty Little Studio products used:

Monday, August 7, 2017

Love Love love Stay curious/ Pretty Little Studio DT

Good morning everyone! Sarah here this morning to share with you a little wall decor I made for my girls room.


I love the Dream Big collection! The colors are beautiful and I love all the bits and pieces that go with it! I had this sign in my scrappy stash and thought it would work perfect for a cute little girly sign, So I pulled out this collection and started playing. I wanted to use that scalloped clear sheet, so I added that as my back drop and worked from there.
I love the delicate doilies that you can find in the shop, so I of course had to use one of those!


I pulled this out this journaling card and used it for my main focus, knowing I was going to add a little more to it, title wise. I cut that yellow bracket piece in half and added it behind the journaling card. Then I decided I didn't want everything to be flat, so I added foam adhesive behind my journaling card and started to add the pretty florals on both sides. I went on and added a few little labels to the bottom of the journaling card and then added in my stay curious flag. I finished everything off by adding a few butterflies and using my distress ink around the side of the whole things. 


Pretty little studio products used:


Tuesday, August 1, 2017

My happy girl-Pretty little Studio DT

Hello ladies!!! I hope your summer is going great! Well Im here today to share with you a layout I made with the Beautiful day collection!


I found this piece of cardstock in my stash that looks like it got to much exposure to some sun and had some washed out edges and spots on it. At first I was thinking, throw it away! lol but I thought it actually looked kinds cool, so I decided to use it and not be wasteful.  I started out by putting my little photo strips onto some vellum and then backing my photo with some of the left over pieces from other layouts that I had made already with this collection.


Since I decided not to waste the cardstock, I thought I would use my scraps for this layout and make sure they got used too! I still have plenty of this collection left, but I thought it would be fun to use things I had already had cut up and with the embellishments, I wanted to used ones I had already cut out or that I only had a few left of. 


So I layered some of my scraps behind my photo, even a piece that I had punched some circles out of and layered them till I was happy with the way it looked. I pulled out some of the labels I had already cut out and layered them behind the photos and layers. I pulled a bracket card out that I had cut in half for another layout, but didnt end up using and layered it in behind my photo and then adding the rest to the left of my layout. I pulled out one of my die cut packs that only had a few pieces left and layered those pretty flowers around my layout as well.


I pulled the gorgeous vellum tape, I hadnt used it yet but really wanted too! So I pulled it out and added the days of the week teal one to the bracket on the left of my layout and then added the rainbow stripped one on top of that. I layered  the other half of the rainbow stripped washi under the paper that had the circles punched out of it and then started to add some of the cute little word stickers that went along with my goofy little photos. To finish everything off I added some Heidi Swapp gold color shine and was done.

Pretty little studio products used: