Showing posts with label papercrafting. Show all posts

Wednesday, September 13, 2023

Waving Hi cards | Cut Cardstock DT

Good morning everyone! I have a fun and quick slimline card for you today.
I used the Cougar Smooth White Cardstock for my card base, along with the portion with the cutouts and for my stamping of my polar bears too. I love this cardstock because I can stamp on it, use my alcohol markers and it stays nice and smooth! And the other color I used is Pop-tone Sour Apple cardstock.
I used my Slim card Basics, creative cuts from Mama Elephant to cut my card out the way I wanted. I popped the white portion with the cutouts up so I could add some dimension and I wanted to make sure the clouds I inked on showed through too.
I added one of my little polar bears to the top hole and one to the bottom. Then I added a banner with my sentiment to the center one and called this card done. I really liked that this was a simple card, but cute! I hope you liked this card and I hope you have a great rest of your week!!

Monday, June 20, 2022

Cute Girl Obsessed | Guest designer for Shimelle

Hey everyone! I was so excited to be asked to be a part of this! And then I kind of freaked out cause I didn't know what I was going to do. Just being honest,lol. But a few days later I walked in to see my daughter playing on her floor with her ponies, dinos and cute little dino blanket on her head and snapped a few pics and thought this was perfect!
I scrapbook a lot of pictures and they always mean something to me, even if it doesn't look like it to others. But this, this was a shot of my little girl, being completely herself and loving every minute of it. I want to make sure to collect all of these moments because she's growing up and doing it fast and I don't want to forget any of it. Ok, ok now to putting my layout together.... I decided in the beginning how I wanted to have my photos clustered together, so I added some adhesive and stuck them together and figured I would figure out the rest as I went. I knew she was looking to the left in all three of them so I knew I wanted my pictures to be on the right side of the layout, then came the little bit of mixed media on the background. I pulled two of my Fun stampers' journey liquid color and splattered them around, hit it with my heat gun, cause I'm impatient and kept moving.
I pulled out my little bin where I keep all my scraps and particley used 6x6 paper pads and started pulling the colors I had decided to use. I have a love for the colors teal,pink and yellow. I also threw in some black and white paper and small touches of gold. These are colors I love together but are also some of my daughters favorites lol, so it works out great for me.
I started pulling papers and tucking them behind my pictures, not even caring that they were from different collections or manufacturers, they looked good together and that's all that mattered to me. I love scrapping this way, it makes it easy for me. Once I had all the layers right where I wanted them, all stuck together, I added some foam adhesive to the back leaving a space to the upper left where I had decided to place a tag that slid down behind the pictures, a little note for my little miss when she gets older. I am not huge on journaling where it can be seen, I usually do it with a hidden journal spot or on the back of the layout, but I wanted to leave a little note for my daughter, something hidden for her, that let her know exactly how this moment made me feel and how I loved it.
After that, I pulled out my bin that holds a bunch of random ephemera pieces and chipboard pieces, pulled things in my color set and started tucking them here and there till I was happy. This always takes longer than I think it probably should, but I move things around sooooo much lol. I thought I was done at this point, I liked my layout and thought my daughter was front and center and pulled the focus, but I felt like my page was a but one sided, so I decided to grab some of my scrap paper stripsand add them to the far left edge and a few little strips at the bottom. I went back and grabbed some of my Bella Blvd puffy stickers and My Mind's eye enamel dots, tucked them here and there and I was finally happy with my layout and called it done.

Tuesday, June 7, 2022

Hello everyone!! Sarah here, sharing another new layout using the Happy Hearts, sampler kit. I love this kit lol. I think I have probably said that a few times since I got it! I have been playing with different page sizes so far this year and this one is and 8.5x11 and it seemed to work out just right.
I started with a white background, I already had my photos in a little photo strip. I knew I wanted my photo strip towards the middle of my layout, so I went through my papers and pulled a few that I thought I wanted to play with. Once I did that I figured this would be a perfect layout for a to-go coffee cup. So I set out making that lol. Any way I can incorporate a coffee, I will lol.
I figured out how I was going to place the to-go cup with my photos. Knowing this, allowed me to know how much paper I could use adding my layers. I added two layers behind my photo and stuck my photo cluster and coffee down, typed up my journaling and added that below my photos. At this point all the things that I needed on my layout were there, so it was time to embellish and add some more pretty papers.
since it was time to play with more fun papers and stuff, I grabbed some of the papers I had pulled previously and cut some strips and added them to the top and bottom, then I decided since my layout was a bit heavy on the left side because of the to-go cup, I should add a little something more to the right. I cut a triangle out of the pretty floral paper and added it to the bottom right and then went to pulling a few florals to add.
I tucked a few little pieces of florals to the top and down at the bottom, tucked under my little triangle and called this layout done. I hope you liked this layout, I love it and can't wait to play with this kit more! Make sure to head over to the shop and check out all the new kits and pretty things!

Monday, May 23, 2022

Wonderful Layout | Clique kits DT

Good morning everyone!! How was your weekend? We had plans this weekend and that didn't happen because it rained and stormed, so we just changed out plans to some indo stuff and still had fun! But this morning I wanted to share a new layout with you that I made using the Sampler kit, Happy Hearts. I love this kit. I have played with it a few time and will keep playing with it till its gone! lol I mean come on, there are pretty papers, puffy stickers and pretty ephemera!
I ran my cardstock through my silhouette, I liked this big pretty ampersand and thought hey with the pictures I'm scrapping that it would work. lol. I backed the leafs in my cut file with some light green paper and then covered the rest with a light pink. I knew i wanted this to be a little more subtle, but still look good. I already had pulled a bunch of ephemera and fussy cut out some flowers to embellish with, so I already had a color idea.
Once I had the cutfile taken care of, I went to backing my photos. I added a white border and then color behind each of them do that they would pop. I played with where I wanted them on my layout, until I was finally ok with where they were sitting and adhered them down.
So at this point with all the pictures adhered down, I could start playing with my title and embellishments. I had pulled everything that went along with reading out of the ephemera and put it to the side when I started this layout, so it was all just sitting there in a cute little bowl for me. I pulled out the fussy cut flowers and tucked them under the edge of some of the pictures and then started adding the pretty books from the ephemera pack I added some of the fussy cut flowers to the top right, along with that cute little puffy sticker that said happy little moments, because for me it is lol, I love to read. I had pulled the word wonderful out from the ephemera pack and popped that up for my title. I printed out my journaling about my books and added that to my layout and I called this one done. I hope you enjoyed this layout, this kit is still available in the shop, along with so many other pretty things! Head over and check it out!

Friday, March 4, 2022

My Unicorn | Clique Kit Design team

Good morning everyone! I hope your week went good. Me, I'm just happy it's Friday! Well I have been listening to A Storytellers podcast and one really made me thing. I have always had an issues with journaling on my layouts. I usually use my memory planner for more of that really. But I realized when listening to one episode, that I'd never wrote down or told the story of my last littles birth. The pregnancy or anything. So, I thought it was time to do that. That's what this layout is.
I used the Happy Blooms kit for this layout. I loved the pretty colors and embellishments, there was just so much to choose from lol. I picked a large picture of my little miss for this layout because I wanted her to be the center of attention. She was so small and cute lol I started by going through my kit and pulling anything I thought I might want to use and setting it to the side. I picked my background, added a strip of that pretty floral paper to the the top and then stuck my picture down. Then I tried to figure out where I was going to put my journaling. I knew it was going to be quite a bit. I decided I needed to write it out to see how much room it was going to take and it tool a lot! At this point I knew it wasn't going to fit on the layout itself, so I cut it down in to strips that would go in a pocket. So that made my decision of how I would get it all in there. Then to make the pocket.
I grabbed two other papers from the kit, it wasn't easy lol, I love them all. I punched a scalloped border out of the pretty pink one and cut a strip of that pretty, smaller floral. I made sure it was big enough to almost completely cover my journaling, than I pulled out my sewing machine and sewed it to my layout. I liked this better anyways, it added more color to the bottom of my layout and gave me a place to put all the journaling I had done. Once I had sewed my pocket down I slid my journaling in and moved on to adding my title and pretty things.
I knew what my title was going to be before I even started the layout. It is private, my daughter will read about it later in her life, but My Unicorn definitely fit. I grabbed the embellishments I had pulled previously and started laying them here and there on my layout, until I got the combo or look I wanted. Making sure to do my little embellishment triangle. I tucked tags and florals here and there, making it look pretty. But my biggest thought was getting down her story. So she could go back when she was older and read the things that happened through my pregnancy with her and read how happy I was she was there. Do any of you avoid journaling on your layouts? Do you hid it like I did? Well I would love to see how you do yours. And make sure to head over to the Clique kits shop and check out the past kits and all the lovely new ones that are there too! Happy scraping!

Tuesday, February 1, 2022

Happiness is here Layout | Clique kits design team

Good morning everyone and Happy love month lol. I know, I'm a goof, but I thought I would kick off this month with a little love layout. I'm using the Forever Love sampler kit by Mimamolina | A.B. Studio. And I have to say I love this kit! Sometimes I like to do mixed media but don't always have time or am to impatient lol. So, this worked out perfectly!
I went through the kit and found this beautiful paper with the mixed media looking heart on the background and thought it would be perfect. I pulled my sewing machine out and stitched a few times around the heart with white thread. Looking back black or gold thread would have worked great too. I left all the strings hanging out because I thought it added some texture to the page. I already knew what picture I was going to be using, so I went to pulling bits and pieces for my photo mat and embellishments.
I pulled from the ephemera in the pack and started layering the pieces under my picture, then I decided I wanted a bit more so I went to cutting up some of the ephemera pieces so I could add them in. There is a piece that looks like it has lace on it, So I decided to fussy cut that out so I could tuck it under the edge of my picture with all the other layers. I added a heart with some of that beautiful teal color and then pulled out the decoupage rice paper and ran it through my big shot and made a little doily out of it and added that to the layers too. Once I did that I figured, hey I should run it threw my sewing machine too, so I did lol. Then I popped it all up n some dimensional adhesive and placed it down and went to working on the other clusters on my layout.
I cut out a larger doily from the rice decoupage paper and a few more hearts, layer them together and stitch them together and pop them on my layout and its done. The paper already had splatters and everything soI didn't have to do that and I loved the way it looked. ​I hope you enjoyed this layout and I hope you head over to the shop and check out all the kits and other pretties that are available.

Tuesday, January 4, 2022

My first Traveler's Notebook | Embrace the journey | Journals For Life DT

Hello everyone!! So, I was completely nervous about this. I had played with TN’s in the past, but just for my own eyes and no one else’s. But really, I had decided not to even try because I do more traditional 12x12 layouts more. But man, do I love playing in a TN, planner, making mini albums and playing with mixed media and I rarely share much of it. But I got the awesome opportunity to be on this great team, Journals For Life and I thought, well maybe this is a sign lol. Yeah, sometimes I am that person. But I’m glad I did it and that the owner took the chance on me. I wanted to share my progression in my real first TN and I wanted to share it with y’all too. The cover is really basic, not a ton to it. But I wanted to keep it that way for the beginning of 2022. I’m trying to look on the bright side and hope to enjoy whatever journey 2022 takes me and my family on.
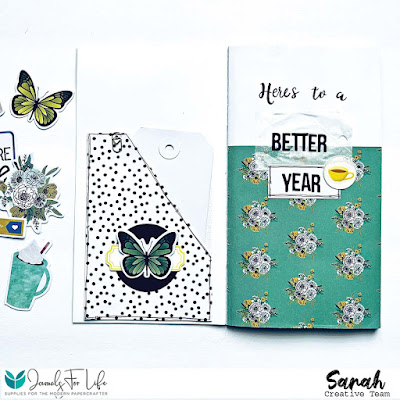
I loved the washi that came in the kit and had to use it. I am a coffee-aholic lol. I had to use that, cause there will be a lot of coffee in 2022, just as there has been in the past! I used that pretty heart from the kits ephemera pack and pulled the phrase sticker and the number stickers from my stash and that was that. Cover done.
I moved to the inside. Now before I started, I did my best not to look at anymore TN’s because I didn’t want to be influenced by anyone else’s designs. But I had seen plenty on Instagram, Pinterest and more lol. But I made it a point not to go looking for them. I knew I wanted a little pocket on my inside cover to store extra tags, this way I didn’t have to go looking when I was in the process of playing, and I wanted a place to put some other item I may not want to put on a page. I ran a die through my sizzix and popped my pocket on the inside page, drew a little line on the edges and poured out the ephemera to add something to the pocket. I cut out a circle, popped a little label through the center and then added that pretty little butterfly in the center. On the first page, or title page? IDK, I thought I would try my hand at some lettering and mixing it with some stickers. I also had the bright idea to try and use some of my vellum as a tag, not sure it was the best idea, but it was stuck down, so yeah there it is lol. But I went with heres to a better year, and I so hope it is! I put one of the clear stickers from the kit on a piece of white cardstock, I thought I was going to cut it out, but decided to use a clear epoxy sticker and make a 3D embellishment for this page, yes more coffee lol. I know this really isn’t that much, but I have moved forward and have done some more. I will share more this week and see what y’all think. Do you have any suggestions? Well, I hope you liked what I did and I hope you’ll come back and see what else I come up with! I have to say I think I did a bit better, not to toot my own horn, but I kind of just let go and had some fun and I think the more comfortable I get with it the more I will be happier with it. Make sure to go check out the Journals.For.Life Instagram and blog to see what all the other ladies are going with the kits too!

Wednesday, May 24, 2017

Hello everyone! Sarah here this morning, I'm playing with the new line Ain't life grand collection again today with a layout about my youngest daughters check up.


The pictures aren't the best of my daughter, but they were just snapped quickly with my cell phone, but she was cute and there for her check up and I wanted to document it, so they got used,lol.
I started with a old Heidi Swapp paper from my stash for the background. I knew I wanted to use the flower die cut pack from this collection and the cool little round stickers, so I just backed my pictures with some white cardstock, chose my journaling card. I stuck those down where I knew I wanted them and then started building from there. I pinched out some flowers from some of the other papers and cards and started layering them in this the die cuts, popping a few up here and there for some dimension.


After I had all the bits and pieces around my pictures like I wanted, I decided that I wanted something across the bottom of the layout too so I started that by adding a strip of paper all the way across the layout. I grabbed a few other papers and layered them behind and on top of the strip. I added a few more flower die cute and things that I punched out. I added a few sequins and a word sticker here and here and that was it for this one. This collection is so bright and beautiful, you can do so many different thins with it!! Thanks for joining me today and checking out my layout.
Pretty Little studio Products used:

Wednesday, April 19, 2017

Hello Flawless/Creating with sketches

Hello everyone!! Sarah here today to share with you my take on this months sketch, #305 and oh man did I love this one!! And I loved this months sponsors too! The Cut Shoppe , Ashley has so many different cut files, I loved working with them! Here's my layout.


I started my layout with a white background at first and then decided to change it up to a wood grain background. I wanted my cut files to pop a little more and on the white background it just wasn't happening.


I added a little a few layers behind my photos and then went to backing my cutfiles. After I backed my cutfiles I placed them on my background where I wanted them and started to layers my photos with other cutfiles.


Then I started to add little embellishments here and there, with a bit of dimension to some of them and some wood pieces, a rub on title and added a few sequins.

We would love to see what you create with this sketch too, so make sure to share your creations on Instagram  using #creatingwithsketches  I hope you enjoyed my take on this months sketch and I would love for you to follow me on Instagram
Thanks so much and cant wait to see what you create!!
-Sarah

Sunday, October 23, 2016

PLS Happy Fall Yall Hanging sign

Good morning happy scrappers! Sarah here today sharing a fall door hanging I made using the fantastic Oakley Avenue collection created by Ashley Horton.


This is fairly simple but I love the way it turned out and it looks great hanging on my front door! I ran 4 of the papers threw my silhouette and cut out some great leaves  and my words and I added them in clusters at the top and bottom of my chalk board sign. 


I ended up painting my words gold before applying them to my sign. I loved all the leaves and I cut out way more then what ended up on here! lol But I figured I would use them later :)

Pretty little Studio products used:


Wednesday, October 12, 2016

Planner spreads with Here comes the sun/ Pretty little Studio DT


Good morning everyone! This morning I'm sharing some spreads from my planner. I really call it memory planning. I use my regular planner, a Create365, I do my normal monthly planning, but then when I go threw each week I print out pictures and add them in along with jornaling about what has gone on that week and other little tid bits. 


I know its already October and I'm sharing from all the way back in August, lol. But as you can see I was a bit busy for a few months with my sweet little new one! I am happy to say that I am all caught up!! Now how long that will last, we shall see :) 
I used Marie-Pierre Capistrans beautiful collection, Here comes the sun. I thought the colors and pretty water color whimsy where perfect and went amazingly well with all my memories I put in my planner.

I have multiple weeks here for you and quite a few close ups, I hope you enjoy!


And this cute little flamingo is so stinking cute!! I need more!


Here is week 3:


And Week 4:


I love how I can journal in my planner and still hide it with those amazing little 3x4 cards. 
This month was amazing for us, with having our little girl come into this world, but we had some very hard times for our whole family this month as well and I wanted to document both good and tragic, but I also didnt want it right out there for everyone and those cards were a perfect fix for that!


Pretty little Studio products used:


Sunday, October 2, 2016

Love love love you so much / Hip Kit club CT

Good morning everyone!
Well I'm sharing my last layout that I created for Hip Kit club as a design team member. Septembers kit was AMAZING!! I loved all the beautiful papers and embellishments that there were to play with.


This layout is of me and my oldest son at his elementary school graduation. He did so good and I'm so proud of him! He ended the year on such a high note, so happy, cant tell I'm a proud momma hu? lol
This was actually after graduation, there was a little celebration for all the kids and their families and of course were a goofy family, so we took a nice picture and then the goofy took over!


The pretty papers from the Maggie Holmes, Gather collection were fantastic along with the Simple Stories, Posh papers, the combination was great and it worked great for a page with a boy. A lot of people may see this as a kit full of pretty pinks and florals, but there are plenty of things to make a boy page too!

I layered that great cut-file Ashley Horton created on the teal paper by Simple Stories and both of those on a sheet of white cardstock by American crafts. I added layers behind my pictures and then I started playing with all the little pretties in the kit and layering them around my layout.

I enjoyed my time with Hip kit club, but now its on to new adventures so I hope you come back and check out what I'm up to and keep checking out the Hip Kit blog!