Saturday, August 12, 2017

Scrappy Saturday-Being weird/ Spieglemomscraps DT

Good morning ladies!! 
I hope your enjoying your weekend so far!! This is our last weekend before the kiddos go back to school and oh man we have a lot going on! We have our oldest sons 1st football game of the season, our youngest is turning one!!! Omg! And making sure everything is together for school Monday. And in there some where I want to try and find some more time to scrap!! lol
But on to the actually layout I came to share with you this morning. Lol This week over on the Spiegelmomscraps blog were scraplifting the fantastic Katty Miranda!
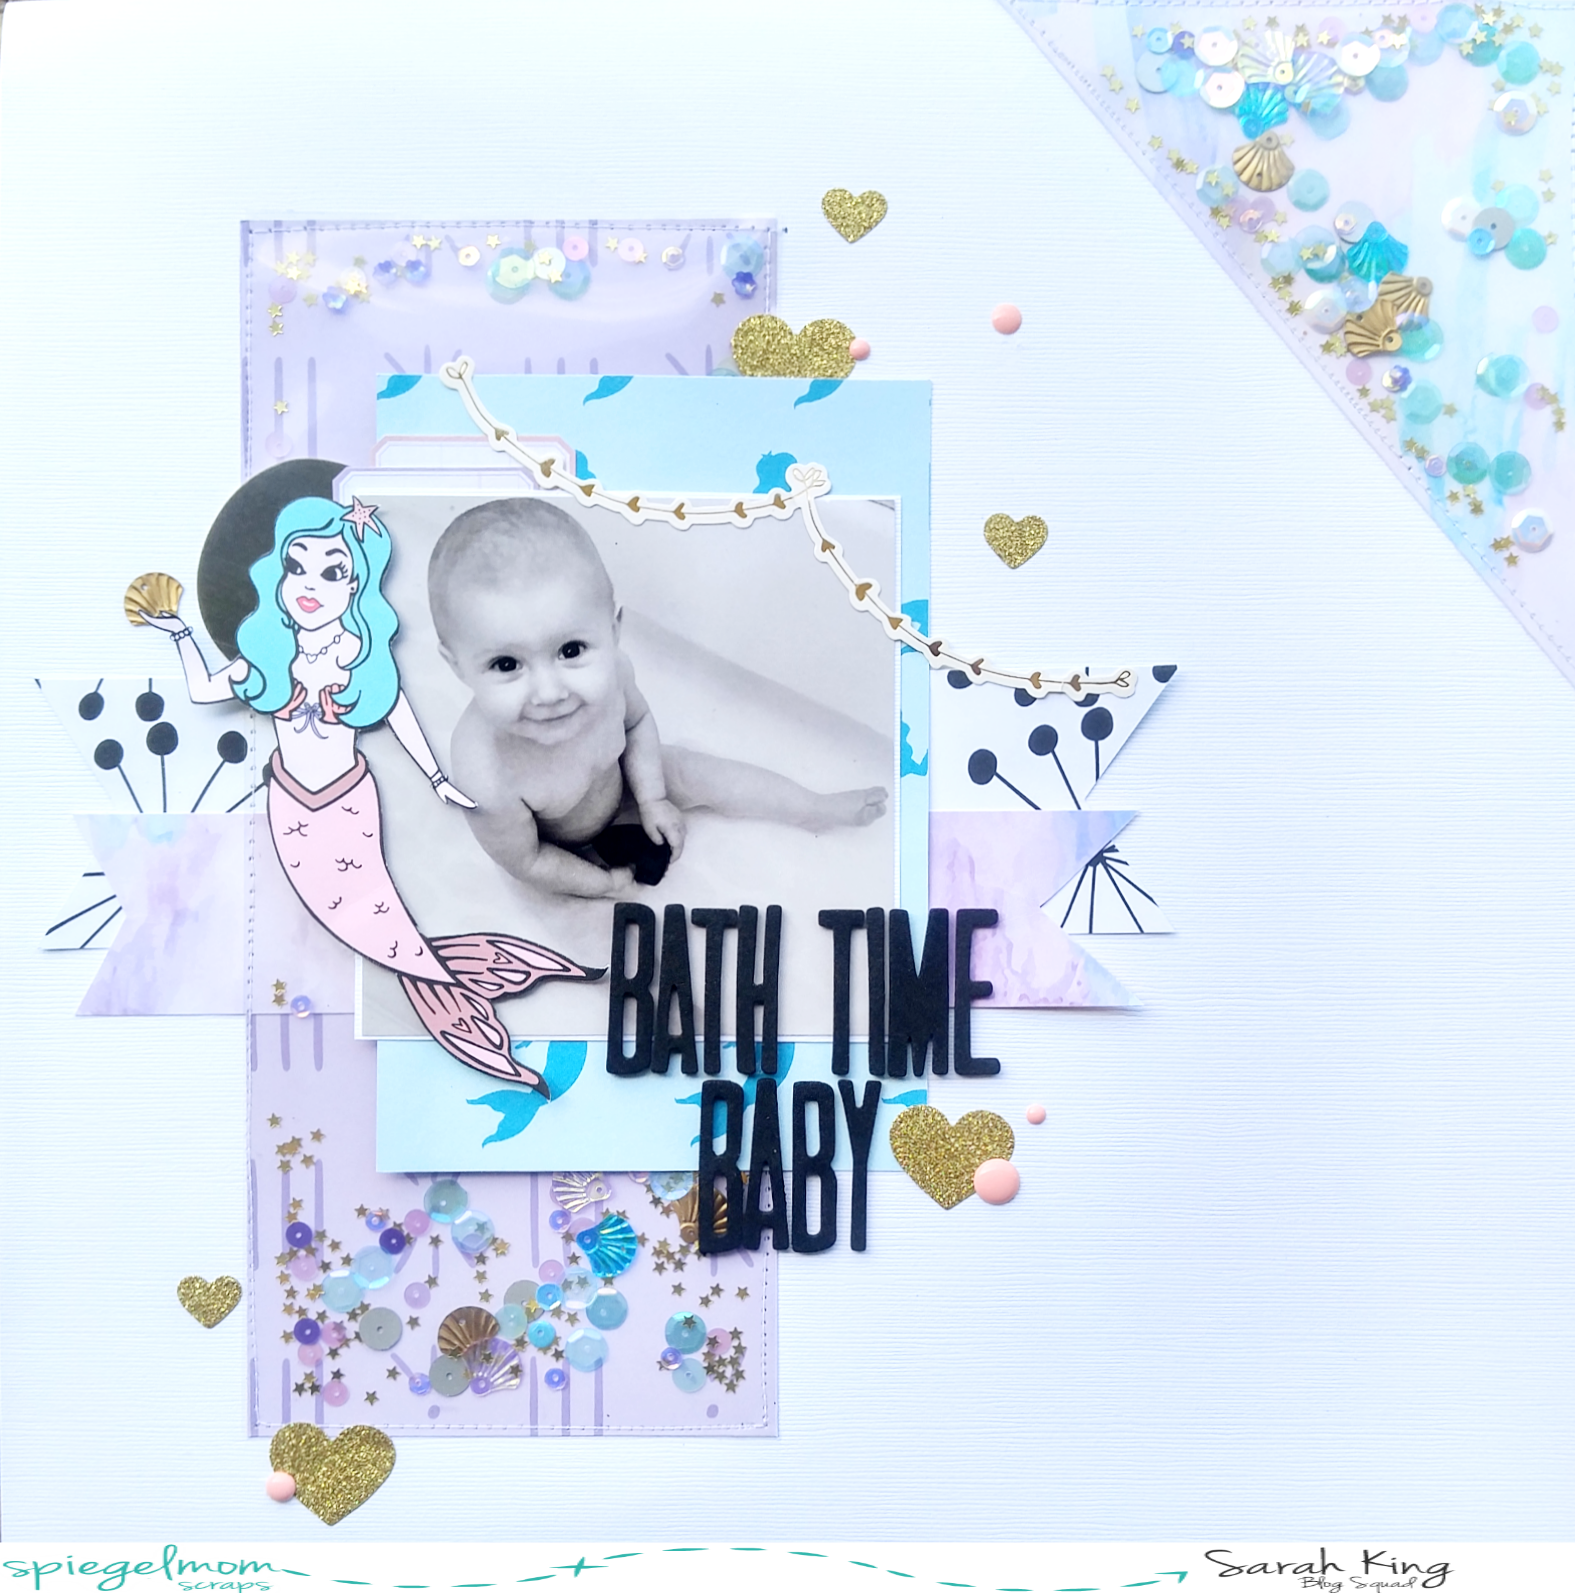
Here is the layout I chose to scraplift of hers:


To start my layout I pulled out a few of my favorite shimmerz and played with the packaging technique on the background. Mine is no where near as bright as Katty's but I loved the way the colors blended together and went with the Create Paper  Confetti collection that I had decided to use. I know I could have made them stand out more but I decided to not use gesso on the background and keep it a but lighter.


I wanted to scrap this goofy picture of me and my hubby playing with one of the Snapchat filters. I have a lot of these kind of pictures! Me and my kiddos play with it all the time too! lol I layered a few papers behind my picture and then moved on to embellishing. 


I wanted to add a lot of embellishments like Katty had, but I didn't want to use so many flowers since this was just a goofy pic of me and my hubby. I mean dont get me wrong I could have easily used flowers, but I wanted to use some of the pointed circles that were in the collection already. But I did add a few flowers in there too!  


After adding the paper embellishments in there and getting them where I wanted them, I stuck them down and started playing with some of the chipboard pieces and other 3D embellishments. And pulled out my cute little Shooting cork stars and layered them in where I wanted them.


I always save the best for last! I pulled out one of my favorite sequin packs right now, Fairy Garden. I love playing with my sequins! lol I added those beautiful little shiny pops of color here and there on my layout and was done.
I loved scraplifting Katty this week, I had fun with it! And I hope your liked my take on Katty's layout!!

And remember if your looking for some pretty shinys to add to your stash, make sure to head to the SpiegleMomscraps store and use my name to get 15% off!!
I hope you enjoy the rest of your weekend!!!


Tuesday, August 8, 2017

Oh my darling/ The Fairytale club DT

Good morning everyone! Sarah here with you this morning to share with you another layout with the "Sweet" kit. I mean have you seen this kit? Have you gotten it for yourself? Omg I just love this kit! The colors are amazing and all the little ephemera is just too cute! I mean theres a unicorn and a little record player, not to mention all the other cute little things like candies and Popsicle!


I don't use a lot of patterned backgrounds unless there black and white, Im branching out and using color cardstock too. lol But I just loved this two toned triangle paper, it jumped out at me so I used it. I added a white card stock boarder behind my photo strip. I grabbed the patterned paper that has the light pink triangle on one end and used that to add another layer. I wanted some of the blue in there too, so I grabbed the bold black, white and blue paper and used it for another layer.


I laid my photo strip where I wanted it and started playing with embellishments. I loved those little candy ephemera with the little heart faves on them but didnt want the actual candy on my layout, so I just cut the centers out of them and used them for embellishments. I did the same thing with the sucker. I wanted a few more and a bit of a bigger one, so I grabbed some of my planner pages and cut some of the bigger ones out too. I popped a few up on foam adhesive to give some dimension. I had already cut my title out on my Silhouette, do I put it at the bottom of my layout, since it was so big. Plus it gave me another place to embellish. I wanted some more of the blue color on my layout, so I cut some 1/4 inch strips and added them down by my title. I thought I was going to just add them there, but I liked it and decided I wanted some more of it, So I went back and cut some more and added two more strips under my photo and then up to the top left hand side. 


At this point I liked my layout but it felt like it was missing something, so I jumped back on my Silhouette and cut out that stripped heart and backed it with the white patterned paper that looked like it had brush stroked on it in all the different colors. Once I had that backed, I added it  behind my photo strip and I loved the way that looked. Then I decided to add some stitching to add some texture. So I just machine stitched along my little blue strip. 
I have a habit of using my color shine and shimmerz sprays to add splatters to my layouts, so I thought I would go a little different route this time. So I punched a few circles out from my white card stock and added them to my layout instead and to finish it all off I added a few light pink enamel dots from my stash. 
I really had fun going a bit of a different route for me for this layout. I hope you enjoyed it too! 


Monday, August 7, 2017

Love Love love Stay curious/ Pretty Little Studio DT

Good morning everyone! Sarah here this morning to share with you a little wall decor I made for my girls room.


I love the Dream Big collection! The colors are beautiful and I love all the bits and pieces that go with it! I had this sign in my scrappy stash and thought it would work perfect for a cute little girly sign, So I pulled out this collection and started playing. I wanted to use that scalloped clear sheet, so I added that as my back drop and worked from there.
I love the delicate doilies that you can find in the shop, so I of course had to use one of those!


I pulled this out this journaling card and used it for my main focus, knowing I was going to add a little more to it, title wise. I cut that yellow bracket piece in half and added it behind the journaling card. Then I decided I didn't want everything to be flat, so I added foam adhesive behind my journaling card and started to add the pretty florals on both sides. I went on and added a few little labels to the bottom of the journaling card and then added in my stay curious flag. I finished everything off by adding a few butterflies and using my distress ink around the side of the whole things. 


Pretty little studio products used:


Saturday, August 5, 2017

Scrappy Saturday-Bath time baby/SpiegelMomScraps DT

Good morning everyone and welcome to Scrappy Saturday!!!
This month were having fun with some scrap lifting and I was so excited about this! This week were scrap lifting the great Kat Benjamin! It was so hard for me to choose one layout, I went through and saved a ton, just like with all the others and then went back through and eliminated them as I went, lol, so hard!

Here is the layout of Kats that I finally decided to scrap lift.


And here is my scrap lift of it!
I loved the layout and knew what picture I wanted to use, along with what collection! I still had some of my  Story Time kit left from The Fairytale Club and the colors and the cute little mermaids were just perfect along with the beautiful sea shell sequins!


I went through and chose what papers I was going to use and pulled out one of my planner dashboards and fussy cut that beautiful little mermaid out.


I arranged all my papers like Kat had arranged hers and then went to pulling out my clear sheets and sewing them down to the long rectangle at the back of my layering and up on my corner. I chose to go with my clear sheets instead of vellum because I wanted to be able to see the patterned paper behind them still after I got the sequins added in.


I left a small space open and poured my sequins in. I used a mix of different sequins, I love that you can mix and match them and they still go so well together! I used some from Black Tie event, Sparkle Power, Sweet Summer Vibes, Bold Stardust and 2 of the min sequin packs, the blue and purple shells. Everything went together so perfectly! I was so happy with it. Kats layout was amazing and I had so much fun playing along and putting my twist on one of her beautiful layouts!
If your looking at adding some great little sparklies to you scrappy stash, make sure to use my code when you go to the shop and get an extra 15% off your order!


Tuesday, August 1, 2017

My happy girl-Pretty little Studio DT

Hello ladies!!! I hope your summer is going great! Well Im here today to share with you a layout I made with the Beautiful day collection!


I found this piece of cardstock in my stash that looks like it got to much exposure to some sun and had some washed out edges and spots on it. At first I was thinking, throw it away! lol but I thought it actually looked kinds cool, so I decided to use it and not be wasteful.  I started out by putting my little photo strips onto some vellum and then backing my photo with some of the left over pieces from other layouts that I had made already with this collection.


Since I decided not to waste the cardstock, I thought I would use my scraps for this layout and make sure they got used too! I still have plenty of this collection left, but I thought it would be fun to use things I had already had cut up and with the embellishments, I wanted to used ones I had already cut out or that I only had a few left of. 


So I layered some of my scraps behind my photo, even a piece that I had punched some circles out of and layered them till I was happy with the way it looked. I pulled out some of the labels I had already cut out and layered them behind the photos and layers. I pulled a bracket card out that I had cut in half for another layout, but didnt end up using and layered it in behind my photo and then adding the rest to the left of my layout. I pulled out one of my die cut packs that only had a few pieces left and layered those pretty flowers around my layout as well.


I pulled the gorgeous vellum tape, I hadnt used it yet but really wanted too! So I pulled it out and added the days of the week teal one to the bracket on the left of my layout and then added the rainbow stripped one on top of that. I layered  the other half of the rainbow stripped washi under the paper that had the circles punched out of it and then started to add some of the cute little word stickers that went along with my goofy little photos. To finish everything off I added some Heidi Swapp gold color shine and was done.

Pretty little studio products used: